Wooassist

Assistance for Your Woocommerce Store

  • How it Works
  • Pricing
  • Services
    • Site Maintenance
    • AI SEO and Content Marketing
  • Blog
    • How-To Articles
    • Code Snippets
    • SEO For E-Commerce
    • Theme and Plugin Reviews
    • Wooassist News
    • WordPress/WooCommerce News
    • Interviews
  • About Us
  • Contact
You are here: Home / Archives for John

How to Fix Checkout Problems in WooCommerce

June 6, 2016 By John 84 Comments

how to fix checkout problems in WooCommerce

One of the biggest problems a WooCommerce store owner can encounter is when the checkout fails. There are a lot of different types of issues that could happen during checkout, but these can be fixed easily if you can identify what is causing the problem. However, finding out the cause is not always easy for the average user. In this post, we will teach you how to fix the common checkout problems in WooCommerce.

The information in this post may or may not help with the specific problem that you are experiencing with your checkout. You may have a similar problem but the source could be different, hence the solutions mentioned here may not work for everyone. It is best to have a developer adept in both WordPress and WooCommerce make the suggested fixes for you. We also recommend that you create a staging/development site and do your debugging there rather than on the live site.

Most Common WooCommerce Checkout Issues

Here at Wooassist, a lot of new clients come to us with problems on their checkout. Having issues on the checkout page can be daunting as it can be difficult to figure out the cause. The checkout page is crucial because it is the last page of the “user shopping experience”. A simple error that could be fixed in a few minutes can hurt your business if it is not addressed swiftly. You could end up losing business opportunities and customers. To fix the problem, we need to figure out what the error is first.

Below are some common issues we encounter that you could be experiencing right now on your WooCommerce store.

Checkout Page Isn’t Available and is Just Redirecting Back to an Empty Cart

cart-is-currently-empty

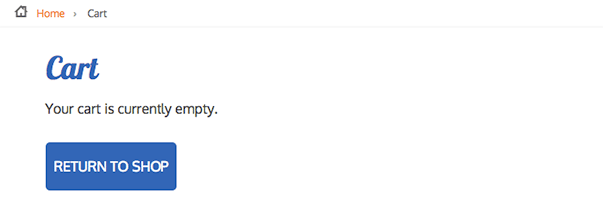
While there are many reasons why checkout would redirect to an empty cart, it’s usually because your hosting is not totally compatible with WooCommerce.

The issue is most common with stores that enabled “force https on checkout”. In this case, the issue could be caused by a PHP security module called Suhosin. WooCommerce already has an official fix posted for this.

Simply paste the code below in your server’s PHP settings.

suhosin.session.cryptdocroot = Off

Review Order Section is Stuck on Loading

review-order-session-stuck-on-loading

When a customer enters their shipping/billing information, this triggers a script to reload the review order data. When there is an error in the script, it will just get stuck without an error shown that would’ve helped you understand what’s happening.

This usually happens when the returned data is not what WooCommerce expects. This is caused by either a plugin or template conflict. To fix this, you will need to check compatibility with all plugins installed and update any outdated WooCommerce templates.

Payment Option is Not Working

Some popular payments options are PayPal, Stripe, Authorize.net and eWay. These are the services that you’ve installed in your store to handle the payment process between you and your customers. This is the page where users enter their credit card information and hit the “place order” button.

Here are some scenarios where the payment option does not work:

Payment option is not available on checkout

You are sure that you have completely configured your payment option but it’s not showing up on the checkout page. This usually happens with stores that don’t have an SSL certificate installed and the payment option requires one. You can learn more about SSL in this post.

Authentication error pops up

When an authentication error pops up, this means there is something wrong between the connection of your store and your payment option service provider. To fix this, check that the credentials you entered in the payment option’s settings are correct.

Unknown error pops up

Checkout-unknown-error

Unknown error popping up could mean that a PHP script in WooCommerce isn’t working properly. There are many things that could cause this. It may be due to a plugin conflict, or your hosting doesn’t support the custom AJAX endpoints utilized by WooCommerce. To fix this you will need to check each plugin installed. Try disabling the plugins one at a time and see if that fixes your problem.

Nothing happens after clicking “Place order” button

If nothing happens when you click the place order button, then most likely there is a JavaScript conflict in the checkout page. The best way to fix this is to check your browser’s console to see which scripts are in conflict. You’ll want a developer to do this for you though.

Did any of these help solve your checkout page problem? If you have any other problems with checkout on your WooCommerce store, you can hit the comments or contact us and we’ll see what we can do for you.

Filed Under: How-To Articles Tagged With: best practices, checkout form, code snippet, how-to, security, website maintenance, WooCommerce

How to Create a Contact Form for WooCommerce

June 3, 2016 By John Leave a Comment

How to Create a Contact Form for Your E-Commerce Store

You might have used a good amount of your resources to create a website for your business. You have an inviting and irresistible call-to-action. The last thing you’d want to happen is for a potential customer to bounce away from your site because they couldn’t find your contact information.

The Contact Us page is one of the most important pages on your website. It is one of the easiest ways to give your visitors a means of getting in touch with you.

What Do You Need to Have on Your Contact Us Page?

Having a contact form is just about the easiest way that a user can contact you. If you have several departments such as customer support, sales, press, etc. it may be worthwhile listing the contact information for each department in addition to the contact form. This can include the name of the contact person, e-mail and a phone number. If you have an office that can accept visitors, then putting your office address and a map would help.

It is important to note that your contact information should also be easily visible on your website’s home page. This increases the trust rating of your website.

How to Create a Contact Form Using a Plugin?

There are several ways to add contact forms on your WordPress website. The easiest method is by using a plugin.

There are plenty of plugins to choose from and they easy are to set up. You can choose which fields you want to include on your contact form. Here are the ones that we can recommend.

How to Create a Contact Form Using Contact Form 7

Contact Form 7

Contact Form 7 is one of the most popular plugins for creating contact forms. Currently, it has over one million active installs. It is free and it gives you the ability to create multiple forms that you can modify with markup. You can also place a contact form in any post or page using a shortcode.

To create a contact form using Contact Form 7, you need to do the following steps:

  1. After installing the plugin, mouse over “Contact” and then click “Contact Forms”.
  2. Customizing the form may take a bit of HTML skills. Basically you use shortcodes to customize the fields. For example, the shortcodes for a text field looks like [text* your-name].Contact Form 7_Add New
  3. Under the “Mail” tab, you can configure the email that will be sent after the confirmation. You can add the values of the fields to your email using the corresponding tags. For example, the email field [email* your-email] has the tag [your-email].Contact Form 7_Mail Tab
  4. Save the form.
  5. Copy and paste the shortcode to insert the form to your Contact Us page or wherever you want it shown.

How to Create a Contact Form Using Visual Form Builder

Visual Form Builder

Visual Form Builder was designed for fast and easy form building. There are no coding requirements. It has an intuitive drag and drop interface which lets you build forms fast.

You can insert your forms in any page or post using shortcodes. It has a logic based anti-spam system, a customizable confirmation message, and a multiple field layout option. It has an extensive FAQ page for customization and troubleshooting. It has an affordable premium version but the free version offers a lot too.

To create a contact form using Visual Form Builder, you need to do the following steps:

  1. Install the plugin and navigate to “Visual Form Builder”.
  2. To create a new form, click on “Add New Form” and fill in the required information.
  3. Drag and drop the fields you need to the right and edit the details.Visual Form Builder_Add New
  4. Save the form when you are done.
  5. Under “Display Forms”, you can find the shortcode that you will paste on your Contact Us page.

How to Create a Contact Form Using Gravity Forms

Gravity Forms

Gravity Forms is the most popular paid contact form plugin for WordPress. It is one of most beginner friendly WordPress form plugins. With the help of some other add-ons, Gravity Forms can also be used to create surveys. It comes with premium support options and that is something you can get for spending extra bucks for this plugin.

To set up Gravity Forms, follow these steps:

  1. Install the plugin and activate your product under Forms > Settings tab. Enter your activation key and you’re set to make your first contact form.
  2. Create a new form and then start adding the necessary fields.
  3. Customize the properties of each field.
  4. Save your form.
  5. Edit your contact page to insert the form by pasting the shortcode. Gravity Forms_Form Editor

How to Create a Contact Form Using Ninja Forms

Ninja Forms

With its really simple, intuitive, drag-and-drop interface, Ninja Forms is an excellent and powerful tool for building contacts forms in WordPress. Ninja Forms’ base product is free. If you wish to extend its functionality like connecting with Campaign Monitor, Freshbooks, Salesforce, SMS notifications, etc., you can buy the corresponding premium extensions.

To create a contact form using Ninja Forms:

  1. Once plugin is installed, find the “Forms” tab on your WordPress Dashboard then click on “Add New”.
  2. In the “Form Settings” tab, you can see a lot of settings but the most important one to fill in is the form name. Other settings are quite intuitive but if you need some help, you can check out the Ninja Forms Documentation.Ninja Forms_Form Settings
  3. The “Field Settings” tab is where you actually build your form. Drag and drop the needed fields and fill out the information. It is very easy to navigate so you can play around to learn the features. The best way to learn how to do it is actually doing it yourself.Ninja Forms_Field Settings
  4. You can edit the email notifications in the “Notifications” tab.
  5. Once you’ve completed your contact form, you can preview it in the “Form Preview” tab. Don’t forget to save it after.
  6. Navigate to the ‘Edit’ mode of your Contact Us page. Find the section “Append A Ninja Form”, then select the form you just created and save the page.Ninja Forms_Append

How to Create a Contact Form Using Formidable Pro

Formidable Pro

Among WordPress users and developers, Formidable Pro is another popular choice. Formidable Pro provides a unique interface from which you can create stunning forms on your WordPress site. This form builder plugin has almost everything you’d need from a premium form plugin. Formidable Pro is a breath of fresh air. Its free version is powerful enough but going for the premium version gives you more features like integration with MailChimp, Aweber, Highrise, Twilio for SMS, WPML, and Zapier.

To set up a Formidable Pro contact form:

  1. After installing, go to Formidable > Forms and click “Add New”’ at the top of the page.
  2. You can start with a blank form or select from a template.
  3. Drag and drop the needed fields. The field settings are quite intuitive so you will learn as you select them.
  4. Click “Create” to save your form.
  5. There are two ways to publish a form on your Contact Us page:
    • Use the shortcode builder. Click “Formidable”, select the correct form, and then click “Insert into Post”.

      Formidable Pro_Shortcode Builder
      img1 – In the Edit mode of your page, click “Formidable”

      Formidable Pro_Shortcode Builder_Insert
      img2 – Select the correct form, then click “Insert into Post”
    • Insert the shortcode manually. Navigate to your form and in the upper right corner click “Show” then copy the form shortcode.

      Formidable Pro_Show Shortcode
      img1 – Click “Show”

      Formidable Pro_Show Shortcodes
      img2 – Copy either one of the two shortcodes

Note that the first shortcode [formidable id = 86], only shows the form itself. If you want the title and description to be displayed as well, copy the second shortcode [formidable id = 86 title=true description=true].

How to Create a Contact Form Using Fast Secure Contact Form

Fast Secure Contact Form is another popular free WordPress contact form plugin. Its name says it all. If you hate spam with a passion, then this is the plugin for you. It includes Akismet support to block spammers. You can also install a companion plugin to add CAPTCHA support.

To set up Fast Secure Contact Form:

  1. Install the plugin.
  2. Click the Plugin tab in the WordPress admin interface, then click “FS Contact Form”.
  3. Under the basic setting fill in the form label and the welcome introduction. The most important thing is to fill in the email address where you should receive the user information.
  4. The “Field” tab is where you actually build your form. You will see a default form with the default fields.
    • To add a field, click “Add New Field”. To edit the field, click on “Show Details”.
    • You can remove a field by clicking the “Show Details” then checking the “Disable Field”.
  5. Save your form when you’re done and locate the form shortcode.
  6. Copy and paste the shortcode to the Contact Us page.

Which is the Best Contact Form Plugin for WordPress?

Well there you have it! These are some of the more popular contact form plugins out there but there are more. Now you might ask what the best contact form to use is. Unfortunately, there is no definitive answer to that question as it will all depend on what you need in a contact form.

What is your favorite contact form plugin? Tell us in the comments.

Filed Under: How-To Articles, Theme and Plugin Reviews Tagged With: admin, e-commerce, how-to, plugins, WordPress

How to Write Easy-to-Read Content for Your WooCommerce Store’s Blog

June 1, 2016 By John Leave a Comment

how to write easy-to-read content

It’s important to come up with a strong headline and back it up with great copy. But if readers find your content hard to read, they could leave your site. To avoid this, you should optimize your content for ease of reading. Use of simple words along with visual aids such as images, charts, graphs, videos, and proper heading structure should help you achieve this.

In this article, we’ll show you some tips on how to write easy-to-read content. We will also recommend a few tools that can help you write simple content.

Why Should Content Be Easy to Read?

A web usability study showed that 79% of web users are ‘scanners’, not readers. This means a typical user will scan the article, picking out individual words and sentences. If the scan deems the page as not very useful, the user won’t bother reading it and promptly skip to the next search result. Users can afford to be picky because of the abundance of good content on the web. With an estimated 3 million new blog posts every day, there’s a lot of competition.

Published content is meant to be read. For this to happen, you need to satisfy the user’s needs in the first 10 seconds as they scan your post. The web user clicked that link to your article because its headline promises an answer to the web user’s question or it has piqued his interest. With content optimized for ease of reading, the user will find more value in reading your content in its entirety.

Maintaining a blog on your WooCommerce store with great, easy-to-read content is an effective way to build traffic and convert visitors to customers. In fact, a survey showed that 57% of companies with a blog acquire customers from their blog.

How to Write Easy-to-Read Content?write-blog-laptop

Forget about complex sentences, long paragraphs, and difficult words. Keep the message clear. Avoid confusing your readers by trying to sound good. Here’s a list of the things that you can do to ensure your content is easy to read.

  • Break up your post with subheadings. Subheadings make the structure of your content clearer and easier to dissect. This is invaluable when writing long articles. Scanners will naturally be guided to the important points that they are searching for.
  • Introduce more white space. Adding just enough white space in between paragraphs makes content easier to read. Without line breaks, your article will look like a big block of content that is unreadable.
  • Use bulleted and/or numbered lists. Bullet lists are best used when enumerating. Numbered lists, on the other hand, are best used when mentioning steps that need to follow a certain order.
  • Structure your paragraphs in the inverted pyramid style. This means you include the most important information at the start of the article and the least important information at the end. This is the structure of most news reports. However, this kind of structure does not work for all audiences so take this with a grain of salt.
  • Avoid long paragraphs. If possible, a paragraph should be made up of 3-4 sentences at most and only deal with one idea. Neil Patel actually uses one-sentence paragraphs throughout his blog and it makes his content easier to read.
  • Avoid passive voice. Using passive voice is not necessarily wrong but it weakens the clarity of your writing.
  • Avoid using adverbs. Adverbs are unnecessary and most of the time is just overly descriptive to the point that it is insulting to the readers. For example, one can say “scream loudly” when in fact screaming is done loudly.
  • A complex topic can be broken into a series of posts. While long articles are good in their own right, short articles are easier to read. If you are looking to write a 2000-word article, you can consider writing a series of short articles instead. This can also help you gain a loyal following on your blog as the readers look forward to the next part of the series.
  • Add relevant links where needed. When you reference something, it is important to link to it. If your reader wants to learn more about that topic, they can simply click on the link. Linking to your sources also adds to your site’s credibility. Not to mention it can be an opportunity to reach out and network with other people in your niche.
  • Use images and other visual content. Images make your post less boring. Choose relevant images and make use of charts and graph as needed. Charts and graphs are especially useful when you are presenting data.
  • Use deep captions. These are captions that are two to three sentences long. Along with the image itself, deep captions can catch your reader’s interest, enough for them to read on.
  • Proofread before publishing. It is important to get a new set of eyes to review your content before publishing. Proofreading your own content is okay but a fresh set of eyes can spot errors that you may miss.

Tools to Help You Write Easy to Read Content

Here are some online tools that read easy-to-read content.

Hemingway Editor

Hemingwayapp

Hemingway Editor checks if your content is easy to read by identifying hard-to-read sentences. In ‘Edit’ mode, you can make changes and see real-time Hemingway feedback to the right of the editor. Adverbs, use of passive voice, difficult words/phrases and hard to read sentences are highlighted so you can fix them on the fly.

This style checker includes a readability grade level based on the Automated Readability Index. Readability is the ease with which your reader can understand your writing. A good target is 7 to 8, but don’t go over tenth-grade level.

Grammarly

Grammarly

Grammarly_Menu_Grammarly offers free contextual spellchecker, grammar, punctation, sentence structure and style checks. With a premium account you also get plagiarism checks, vocabulary enhancement and professional proofreading.

If you choose to install its Chrome extension, you can use this to edit content in Gmail, WordPress, pretty much anywhere you write on the web.

After the Deadline

After-the-Deadline

You can use the After the Deadline (AtD) Demo page to check your content online. After you click ‘Check Writing’, click each underlined word to see the suggestion to select or just ignore.

You can also download AtD and use it as a WordPress plugin and extensions to web browsers. This is free for personal use, and they have free server software for commercial needs.

Expresso

Expresso

Expresso can help you analyze and edit content by helping you choose simpler words and identifying weak verbs, filler words, etc. An extensive list of general and editing metrics are found to the right of the editor. Click on one to highlight the associated words. Note that this is still in its beta phase.

Conclusion

Always aim for great content that is easy to read. This will keep readers on your site for longer periods. If you apply the above tips and make use of the online tools, you’re well on your way to writing easy-to-read content. You can even use these tools to optimize your current content and product copy. Soon enough you will see the payoffs in longer session times and probably an increase in conversion.

We hope the tools and formatting techniques here can help you create easy-to-read content. Do you have any other tips to share for writing easy-to-read content? Maybe you know of some other tools that can help. Let us know in the comments.

Filed Under: How-To Articles Tagged With: admin, best practices, blog, content marketing, how-to, marketing strategy, SEO strategy

How to Use Google Analytics to Track Website Goals in WooCommerce

May 25, 2016 By John 4 Comments

Google-Analytics

Knowing your site’s stats is critical in decision making to guide your site to success. Google Analytics is a web analytics service designed for this particular job. If you have a WooCommerce store, you probably have it set up to gather traffic data. In this article, we will teach you how to use Google Analytics to track website goals. Get more value from Google Analytics by tracking the completion of your site goals.

What is Google Analytics?

Google Analytics is a free web service from Google that tracks and reports website traffic data. It was launched in 2005 and is available to all users, whether they use Google for advertising or not. It is tightly integrated with Google Adwords, the company’s main advertising service, as it helps users keep track of their online web marketing campaigns. But using Adwords is not a necessity in order to get the most out of the Analytics.

Why Should You Use Google Analytics?

Google Analytics yields valuable information to help you make smarter marketing decisions, generate more leads and improve user experience. Traffic data can help you identify which of your blog posts provides the most user engagement and which one results in a conversion whether it’s a sale or an email sign-up. You can pinpoint the best time to post a new article. You can see the number of visitors who exit your site and from what page they exit. With that information on hand, you can look for ways to improve that specific page to reduce exit or what is known as bounce rate. In a nutshell, this treasure trove of data will be invaluable in your decision making for optimizing your website.

How to Track Completion of Goals in Google Analytics?

In Google Analytics, tracking page views and visitors is just the tip of the iceberg. Finding out if your website is actually accomplishing the goals you’ve set for your e-commerce site is more important. In fact, even if your traffic is ranging in the millions but you are not getting your intended conversions, that traffic is mostly worthless. This is where setting goals in Analytics come in. A ‘goal’ is a completed activity in your website that is tracked in Google Analytics. Defining your goals will depend on what kind of website you have. For an e-commerce site, goals can be a newsletter sign up, a purchase, downloading a trial software or e-book, or adding a product to a wish list.

Tracking your goals in Google Analytics will yield crucial data. If you see that many of your visitors add your products to the cart but exit when they reach checkout, there must be something in your checkout process that is preventing your visitors from completing purchases. You can then proceed to analyze and identify what factors you need to try and solve the problem After applying fixes, data from Analytics will help you identify if your tweaks have helped your conversion rates or not.

There are 4 ways to track goal completion: Destination, Duration, Pages per session, and Event.

Destination/URL Tracking

Your website is basically a network of pages represented by an identifier address or URL. Google Analytics provides an easy way to track specific URLs through destination goals. Each time someone navigates to a specific destination URL, it will trigger the goal as completed. This is the easiest and most common way to track goals because it is straightforward and easy to set up. This is ideal for tracking thank you pages every time someone subscribes, makes a purchase, or sends a contact email using the contact form, etc. which registers as a completed goal in analytics.

To setup a URL tracking goal, navigate to the Goals section in Analytics first. Go to Admin and click Goals.

how to use google analytics to track website goals

In Goal Setup, we set our goal name as “Place an order” and this goal will track how many visitors placed their orders/completed the checkout. Since checkout is normally closed with a thank you page, we can track how many times the thank you page is visited to track the number of purchases. Google Analytics also allows users to view other important statistics such as time on site and the referring URL which led to the sale.

In Goal Description, set the goal type as Destination and enter the URL of your thank you page. You don’t have to enter the full URL, just the slug after the domain name will do. So, instead of www.example.com/thankyou.php, just enter /thankyou.php.

domain-slug

In Goal Details, select which of the below corresponds to your desired action.

  • Equals to – Requires the exact same string to trigger a goal. Good for tracking single pages.
  • Begins with – Only requires that string begins with the inputted URL. So if you put “/products” it will track any URL that starts with “/products”. This includes “/products/bags”, “/products/shirts”, etc. This is ideal for tracking a group of related pages under the same category.
  • Regular Expression – This is meant for advanced users. You can write wildcard terms to select a variety of URLs. You can read more about regular expressions in this guide.Google-Analytics_URL-Tracking_Goal-Details

Funnels

The basic concept of funnels for destination goals is to track a series of pages. These pages form the path you expect traffic to take. For example, you might want to get your visitors to watch a video of the product demo, proceed to add the product to cart, checkout and finally the thank you page.

Funnels are optional and not all e-commerce sites have a defined sales funnel. Still this should not be neglected. Tracking your funnel provides insights on how effective your website setup is in achieving your goal. When your visitor exits at the end of your funnel, the goal is triggered.

Setting up a funnel is very handy because you’ll also know how many visitors proceeded to each step. You’ll know at which step most of your visitors abandoned the process so you can make the necessary adjustments.

Google-Analytics_Funnel

Here is a sample data from a funnel. Notice that you can easily view how many proceeded to the checkout from the carts page.

Duration Tracking

This tracks how much time the user spends on your site. To set this up, you just need to set a minimum amount of time in “Goal details” and if the user spends more than that, the goal will trigger. This tracking is useful for tracking goal pages with important content such as infographics, your portfolio or any other content that you want your visitors to view.

Google-Analytics_Duration-Tracking

Pages/Screens per Session

If your visitors reach a specific number of pages before exiting, it will trigger this goal type. This is useful when you have a lot of content that you want your visitors to view. This goal is used mostly by news and other media sites that earn advertising income.

To set this up, set Pages/Screens per session in “Goal details” and then choose a number that you want to target for your goal.

Google-Analytics_Pages-per-Screen

Event

This goal is meant for advanced users. You need to know some script coding to trigger the event. And it can be as specific as you want it to be. Using scripts on your site, you can track a click of the button, scroll on a page, and more specific actions that are happening during the visit.

Wooassist_Call-to-Action_View-Plans

Mostly, an event goal is used on button clicks. While you can use URL tracking to track button click, it becomes a problem when you have multiple buttons on different pages that point to the same URL. You won’t know which button was clicked. With event tracking you can keep track of each button individually. This is very useful in identifying which particular button or button design is more effective in completing your goals. To know more about setting up event tracking, you can visit Google’s guide for event tracking.

Conclusion

Remember that Google doesn’t retroactively track your goals. So it is important that you set up your goals as soon as you have your site running so that you can effectively start collecting data right away. Use the data you gather to improve your conversion rates. Google has provided you the resources to improve your site and increase your income. Now it’s up to you how you will use that data to your benefit.

Was this post helpful? Do you have any tips you’d like to share about Google Analytics conversion tracking? Let us know in the comments.

Filed Under: How-To Articles Tagged With: best practices, call-to-action, conversion optimization, e-commerce, Google Analytics, how-to, marketing strategy, optimizations

Why Should You Keep WordPress Updated?

May 24, 2016 By John 1 Comment

WordPress is getting more popular as a platform for creating e-commerce stores. Because of this, WordPress sites have become attractive targets for hackers to try and break into. There are a few reasons why hackers do this but the main motive has always been for profit. In this article, we will discuss how hackers take advantage of a WordPress site with poor security. You’ll also learn what should be done before a site update and other means to keep your site safe.

How Does a Hacker Take Advantage of a Compromised WordPress Site?

why should you keep wordpress updatedA lot can be done to a hacked WordPress site. It is not just getting sensitive information. Actually, getting sensitive information like credit card numbers is just a “bonus”. It’s not really your website that the hackers want. What they want more is the power of your server resources: computing power, disk space, and anonymity on the internet. So how can they use your server to their advantage? Here are some ways:

Bitcoin Mining

Bitcoin mining is the process of adding transaction records to the Bitcoin’s public ledger. One offers processing power to the public Bitcoin community to validate transactions. He gets a portion of the money being transacted as processing fee. Bitcoin mining is intentionally resource and processing intensive so that the number of blocks found each day by miners remains steady. This is where the hackers can take advantage. They will use your server to mine for themselves, hence noticeably slowing down your site.

Distributed Denial of Service (DDoS)

This attack is an attempt to crash one’s server. It spams that server with thousands of traffic simultaneously, thus denying service for other users. This is commonly used for cheating in online gaming, online gambling, and in taking down a site. Since you can’t overwhelm a server with traffic using a single PC, the likely scenario is that the attacker will have thousands of hacked servers and personal computers to perform an attack. All they need is a single PHP script saved on each site which they can activate at will.

Anonymous Attacks and Spam

Hackers can also use your server to attack or spam anyone anonymously. Since they are using your servers to do these malicious things, these will point to your name and not theirs. They can be churning thousands of spam emails to other people at your expense. They can send viruses and malware through these emails to infect more PCs to aid their hacking.

Data Mining

Hackers can also just mine sensitive information like credit card numbers, passwords, emails and others.

Automated Hacking

hacking-code-destroyMost attacks are automated and target small and unsecure sites. This works similar to how a search engine uses search engine crawlers to index information on the web. The hacker’s crawlers roam around the web to find exploitable sites. When a vulnerability is spotted, the hackers will attack that vulnerable point. Attacks vary from brute force attacks to code injection on contact forms.

Importance of Updating WordPress for Security

The people behind WordPress are working hard to increase security against these attacks. This is what most of the minor updates are for. As the attacks get smarter, the security needs to upgrade as well. Fundamentally, there is no such thing as a perfectly secure system. So whenever WordPress developers see or hear about a possible vulnerability, they will try to fix it as fast as possible.

This is why WordPress updates are very important. By keeping your WordPress core updated, you are protecting yourself from the latest known vulnerabilities.

Things to Do Before Updating

Most of the time, updating WordPress is harmless. However, some major updates that involve the core code may break some plugins or theme files which in turn can break some layout or functionality on your site. That’s why it is important to follow a process before pushing through with an update to avoid breaking your site.

Create a Backup

Creating a backup is the best thing that you can do before pushing through with an update. Backups are your last line of defense in case something goes wrong. If you think it is a hassle, you can actually automate backup creation. There are even hosts that automatically do this for you. However, it is best to have your own backup and not depend on your host to make your backups for you.

Testing on a Staging Site

A staging site is an independent copy of your site. Most hosting sites offer an easy way to make them but you can always create your own. Staging sites are used to ensure that everything works perfectly before you present your site to your customers. This is very important especially for e-commerce sites. You can lose your customers’ trust if you let them experience downtime and bugs.

Other Things to Help You Secure Your Site

cyber-security_keyboard-lockedAside from the updates, there are a lot of things you can do to harden the security of your site. Here are some examples:

Installing a WP Security Plugin

Like creating a backup, installing a WP Security plugin is one of the best things that you can do. Sucuri Security plugin is highly recommended. Basically Sucuri will act as a firewall for your site. It will protect your website from hackers, malware, DDoS and blacklists. It will receive all the traffic going to your site and filter it before sending it to your host. This allows the plugin to block all the attacks and only send you legitimate traffic. Because the filtering/blocking is happening on the Sucuri servers, your servers are relieved of a lot of load. Sucuri has always been the top go-to plugin when it comes to security.

Password Protect Some Directories

Password protecting /wp-admin directory adds another layer of security to your site aside from the login page. This can be done either manually or using cPanel. This is addressed on sites that have a lot of users accessing the wp-admin; for example large news/blog sites that accept guest authors.

Disabling PHP Execution

Disabling PHP Execution from certain directories protects you from backdoor access file attacks. The attacks come disguised as a WordPress core PHP file and inserted in easy access directories like /wp-includes/ and /wp-content/uploads/. Preventing PHP execution from these directories reduces the risk of backdoor access.

Changing the Prefix of Your Database

The default prefix of a WordPress database is “wp_”. Everything on your database will start with this so changing it will make it difficult for attackers to access your database.

Conclusion

Now that you’re more familiar with how hackers work, you can better equip your site to avoid being a victim. Backup your site and do not skimp on WordPress updates, even the minor ones. Remember that these updates will help you safeguard your WordPress site from the latest known security threats. Updates are one thing but you should also harden your site by implementing the strategies mentioned above.

When was the last time you updated WordPress? Do you have any other security tips you’d like to share? Let us know in the comments.

Filed Under: How-To Articles Tagged With: admin, backup, best practices, brute force, e-commerce, how-to, plugins, security, sucuri, website maintenance, WordPress

  • « Previous Page
  • 1
  • …
  • 24
  • 25
  • 26
  • 27
  • 28
  • …
  • 41
  • Next Page »
Let us support your online store so you can manage your business

Get started today

Get 2 Hours of FREE SUPPORT

We are so confident that you will love our services that we will give you your first 4 hours at a 50% discount

That’s 4 hours for only $75

BUY NOW

Free eBook

5 Things Every Online Store Can Fix On Their Website In The Next Week To Increase Sales

Quick Links

  • How it Works
  • Pricing
  • Blog
  • Contact
  • About Wooassist
  • My Account
  • Checkout
  • Privacy Policy
  • Cookie Policy
  • Terms and Conditions

Wooassist

Australia:
59 Luke St.
Hemmant QLD 4174

Philippines:
San Miguel St.
Poblacion, Iligan City 9200

Connect


Copyright © 2026 · Wooassist

Yours FREE!

5 Things Every Online Store Can Fix On Their Website In The Next Week To Increase Sales