What is Apple Pay?
![]() Apple Pay presents a new and more convenient way to pay for mobile e-commerce purchases. Since Apple does not share your credit card details when you pay, it is safe, secure and private. Currently, Apple Pay is already accepted in a number of stores and websites. You can check this list of merchants that accept Apple Pay.
Apple Pay presents a new and more convenient way to pay for mobile e-commerce purchases. Since Apple does not share your credit card details when you pay, it is safe, secure and private. Currently, Apple Pay is already accepted in a number of stores and websites. You can check this list of merchants that accept Apple Pay.
Why Add Apple Pay to Your WooCommerce Store?
Early adopters of Apple Pay have experienced an increase in conversion rates of up to 80%. The checkout process is made much faster as payment only requires a fingerprint check as opposed to entering your credit card number.
What Do I Need to Install Apple Pay on WooCommerce?
To install apple pay with WooCommerce, there are a few requirements. First, the store must support Stripe payments. You’ll also need the WooCommerce Stripe Extension which is free. Stripe is currently available in 10 countries, namely, Australia, Switzerland, United Kingdom, Hong Kong, Singapore, Canada, Spain, France, New Zealand, and the United States.
How to Enable Apple Pay on Your WooCommerce Store
Just follow the steps below to enable Apple Pay on your WooCommerce store. If you have already set up the WooCommerce Stripe Extension, please proceed to Step 7.
-
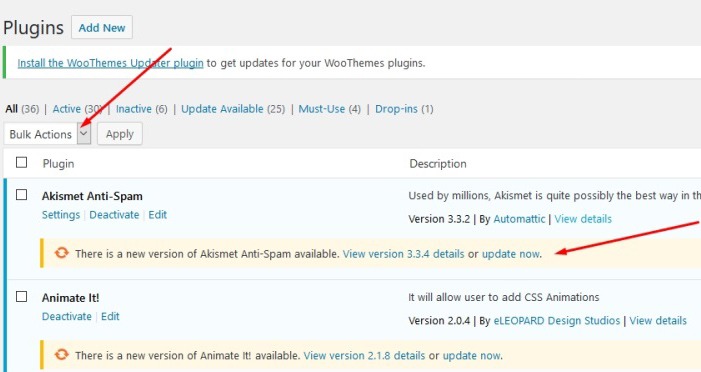
- Install and activate the WooCommerce Stripe Extension. You can download it here or just search for it in the plugins page.
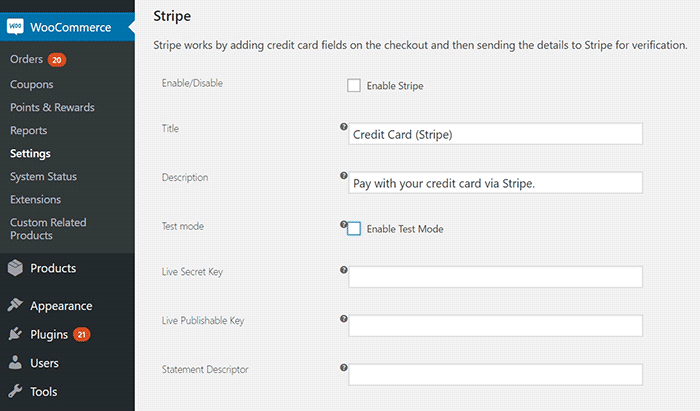
- Head over to WooCommerce > Settings > Checkout > Stripe and check the “Enable Stripe” box. Make sure you disable “Enable Test Mode” if you want to go live. If you are already accepting payment through Stripe, go to Step 7.
- Input your Live Secret Key and Live Publishable Key. You can get the information from your Stripe account.
- Input the Statement Descriptor. This is the text that will appear on your customer’s credit card statement.
- Choose whether to “Capture Charge Immediately” or not. If you choose not to charge immediately, you will need to manually initiate the charge through the WooCommerce order page.
- You can choose to “Enable Stripe Checkout” for the plugin to create a pop-up that requests details. Choose this option if you want to accept Bitcoin.
- To enable Apple Pay, tick on the Enable Apple Pay box.
- Under “Apple Pay Button Style”, you can choose what color you want the Apple Pay button to be.
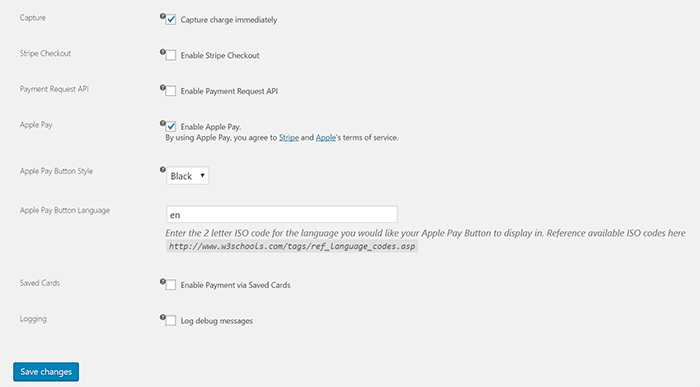
- Under “Apple Pay Button Language”, you can enter the ISO code for the language you want to use. For English, just use “en”.
- Click on Save Changes when done.
That’s it. You are now ready to accept Apple Pay payments on your WooCommerce store.
If you are having problems enabling Apple Pay on WooCommerce, let us know in the comments.


 As a WooCommerce store owner, your goal is to make your business as profitable as it can be. Here, we list down 10 things that you can do today to improve your WooCommerce store.


 After applying the updates on the development site, the next step is to check if the site has any broken features. Some important elements to check are:
 If you’re an entrepreneur it’s important to leverage the experience of other successful entrepreneurs so you can save time, avoid costly mistakes, and achieve your goals faster.