Wooassist

Assistance for Your Woocommerce Store

  • How it Works
  • Pricing
  • Services
    • Site Maintenance
    • AI SEO and Content Marketing
  • Blog
    • How-To Articles
    • Code Snippets
    • SEO For E-Commerce
    • Theme and Plugin Reviews
    • Wooassist News
    • WordPress/WooCommerce News
    • Interviews
  • About Us
  • Contact
You are here: Home / Archives for how-to

Understanding Search Engine Optimization (SEO) Basics for Your Online Store

January 29, 2015 By John Leave a Comment

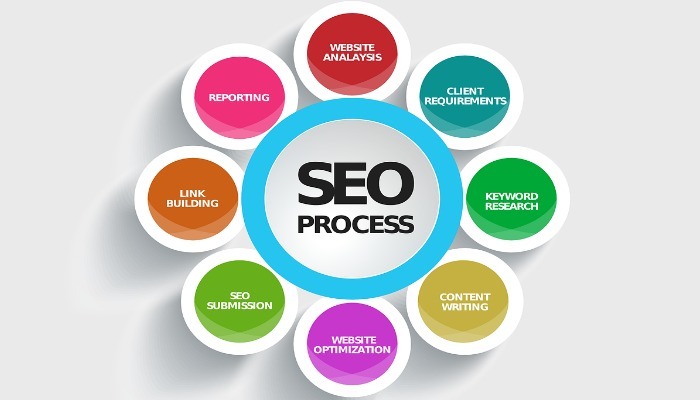
searchengineoptimization

Google’s business model is to return the most relevant search results on the web. That’s why people keep using them – and by ‘people’, it includes your potential customers. Being ranked on the top pages allows companies to receive more visitors and generate more leads.

Google uses complex algorithms to assess the relevance of website across the web. They have hundreds of criteria for determining rankings.

A high ranking in Google translates to more site visitors and potential revenue. But how do you achieve that coveted status?

The answer is a well-rounded website.

It should be a site built on a best-practice code base that offers interesting and engaging content users are searching for. In your case, it is an online store using the Woocommerce platform. Understanding Search Engine Optimization (SEO) for your online store is one of the main factors to creating a well-rounded website.

Search Terms

What terms are your ideal clients using when searching for your service? Play around by creating synonyms, abbreviations, plurals, past tense, present tense, verbs nouns, etc. From one word, multiple search terms can be obtained.

For example, from the word car, we can get: car, vans, automobile, pick-up, etc. You will not rank for cars because it’s too popular, making the competition tight. Go for specific keyword “phrases” like “funny car stickers” or “ford car mats” to help you rank higher, and attract your ideal client.

You can use tools such as:

  • Google Keyword Planner (formerly the Keyword Tool).
  • http://ubersuggest.org/
  • https://serps.com/tools/keywords

Once you come up with your list of keyword phrases, dedicate an optimized page on your site for each keyword phrase.

You can outsource some of the research, but the business owner or sales manager needs to check the list. There is no point optimizing your site for key phrases of products that you either don’t sell, or make very little margin from.

Help Google Find You

Assist Google by labeling your content. Everything on your site can be labeled by meta data. Meta data is not visible to the user, but helps Google web crawlers identify what your site is about.

SnapCrab_2015-06-26_14-32-58_No-0000

All good website platforms like WordPress have this baked in to make it easy to add “meta data” to any page on your site.

Using our example above, “funny car stickers” would need to have a page on your site with metatags, something like:

Title: Funny Car Stickers | Bumper and Window Stickers. Car Decals
Description: Find 1000s+ of Unique Bumper Stickers & Car Decals. Tons of Funny designs available, or personalize your own!

On its own, meta data won’t do much to get you in the rankings. It needs relevant content to back up what the meta data is saying about your site. Your content needs keywords, plus synonyms, and related words. If you are writing about the topic you want to rank for, then this should happen naturally.

On-Page -> Off-Page SEO

Up until this point we have been talking about on-page SEO, which involves strategies controlled by the website owner. Wooassist can help with all your on-page SEO needs, but at this stage we don’t offer an off-page SEO service.

Our proficiency is the technical aspects of WordPress and Woocommerce, not content creation. Off-page SEO is the overall publishing and running of the website across the internet. It involves obtaining in-bound links from other websites. To do that, you need remarkable content that people will share and link to.

Improving Relevance and Authority

Linking from relevant websites is still the number one way to rank high in Google. It’s just harder now to achieve this. A few years ago, it was possible to create these links and trick Google into thinking you were popular.

Now, part of Google’s mission is to detect “un-natural” links, and mark it as deceptive and manipulative. Any link scheme is a violation of Google’s Webmaster Guidelines.

Google encourages quality content, and they define it as written by an expert or enthusiast who knows the topic well. Choose topics that are driven by genuine interests of readers of the site. Provide useful content that people will link to, and share with their friends on social media.

With all the factors you need to consider about SEO, it is easy to make mistakes. Here is a good write-up about those common SEO mistakes that you need to avoid.

The irony is, your site will rank high in Google when there is no longer any need. If you create great content that Google wants you to, and people are sharing your content, then you can get a lot of traffic to your site without the help of Google.
Filed Under: How-To Articles, SEO For E-Commerce Tagged With: Google+, how-to, keyword research, SEO strategy, SEO tools

How to Add a Favicon to your WooCommerce Store

February 29, 2016 By John Leave a Comment

What is a Favicon?

Favicons are typically 16×16 square images. Old versions of Internet Explorer refer to the bookmark section as “favorites”. Hence the name “favorites icon” or favicon for short.

What is the Point of Having Favicons?

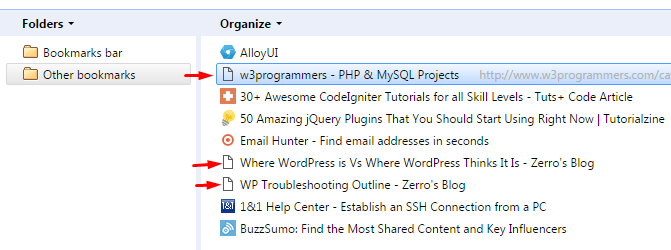
The main purpose of having favicons is to easily distinguish different websites in the bookmarks page. Here is a snapshot of a bookmarks page. Notice that the pages without favicons are hard to distinguish if they belong to the same website or not.

favicons in bookmark manager

Search engines and websites then are not as powerful and strongly connected with links. If you came across a good site, it was usually a good idea to bookmark it. As a result, people often have a long list in their “Favorites page”. The favicon answers the need to tell each website apart in the list at a glance.

Favicons are not limited to bookmarks pages though. It is also used around different parts of the browser like the history page, tabs, and more. Favicons play a huge role in online branding providing easy recognition and association. If you are serious in brand recognition, then you must add a favicon to your site.

Adding a Favicon to Your Woocommerce Store

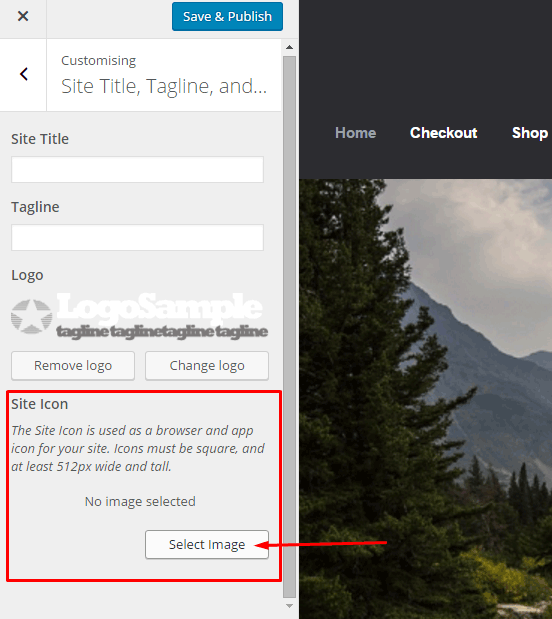
Starting from WordPress 4.3, you can now add your favicon directly using the admin panel. Navigate to Appearance > Customize > Site Title, Tagline, and Logo.

add favicon to your woocommerce - customize wordpress site icon

Simply select a 512×512 image from your media library or you can upload a new one. If you select an image larger than 512×512 or a non-square image, you will receive a prompt to crop your image.

After this, click save and publish. Refresh or restart your browser to see your new favicon.

Note that this is a default feature since WordPress 4.3. If you don’t see this feature in the theme you are using, contact your theme’s support for assistance. Or you can do it the old fashioned way with the steps below.

How to Make a Favicon?

If you have a small logo, that would be good to use for a favicon. Otherwise, you’ll have to create a miniature version of your logo. If you are not comfortable working with graphics, you can contact your graphic designer to help you out.

How to Manually Add a Favicon?

To add a favicon to your WooCommerce store, start by saving the image to one of your site’s folders. You can upload it using FTP or via media library upload. After saving it, take note of the filename and file path. It is best to save your favicon in your website’s root folder or in the images folder of your theme’s folder.

On your Dashboard, navigate to Appearance > Editor. Find your theme’s header.php file. Remember, the best way to edit your theme’s files is via a Child Theme. You can select one from several Storefront child themes to help you customize your WooCommerce store.

Paste the code below in your header.php file just below the other lines starting with “<link rel=”.

<link rel="icon" href="http://www.domain.com/favicon.png" type="image/x-icon" />
<link rel="shortcut icon" href="http://www.domain.com/favicon.ico" type="image/x-icon" />

Replace “http://www.domain.com/favicon.ico” with the file path of your favicon. Save the file and you’re done. You may need to restart your browser to see the new favicon.

I hope we helped you in adding a favicon to your WooCommerce store. If you have any questions and feedback, leave us a comment below. We are always ready to help.

Filed Under: How-To Articles Tagged With: code snippet, design tweaks, e-commerce, how-to, image optimization, photoshop, WooCommerce, WordPress

Improve Website Page Load Speed by Optimizing Images for Web

February 15, 2015 By John Leave a Comment

optimize-images-for-web

Optimizing images on your website whether it’s an e-commerce store, a blog, or both is one of the most important things thing that you can do to improve its performance. And it shouldn’t be a complex task really. Sure, high-res images look great but when you’re loading a 2MB image, it’s going to do more harm than good.

Essentially, you’re going to want to aim for a small image file size without compromising quality. As a rule of thumb, don’t let the images look bad or pixelated just for the sake of being smaller in size. You should strike a balance between a good-looking image and an acceptable image size. Here are a few ways on how to optimize images for the web.

Optimizing Images for Web Using Photoshop

Optimizing images for the web is not at all difficult. If you have Photoshop (or any other image editing software), it’s a very simple process. Open the image on Photoshop and resize or crop your image to the appropriate size.  Remember, when sizing images, the images you plan to use should not have a larger resolution than the image placeholder.

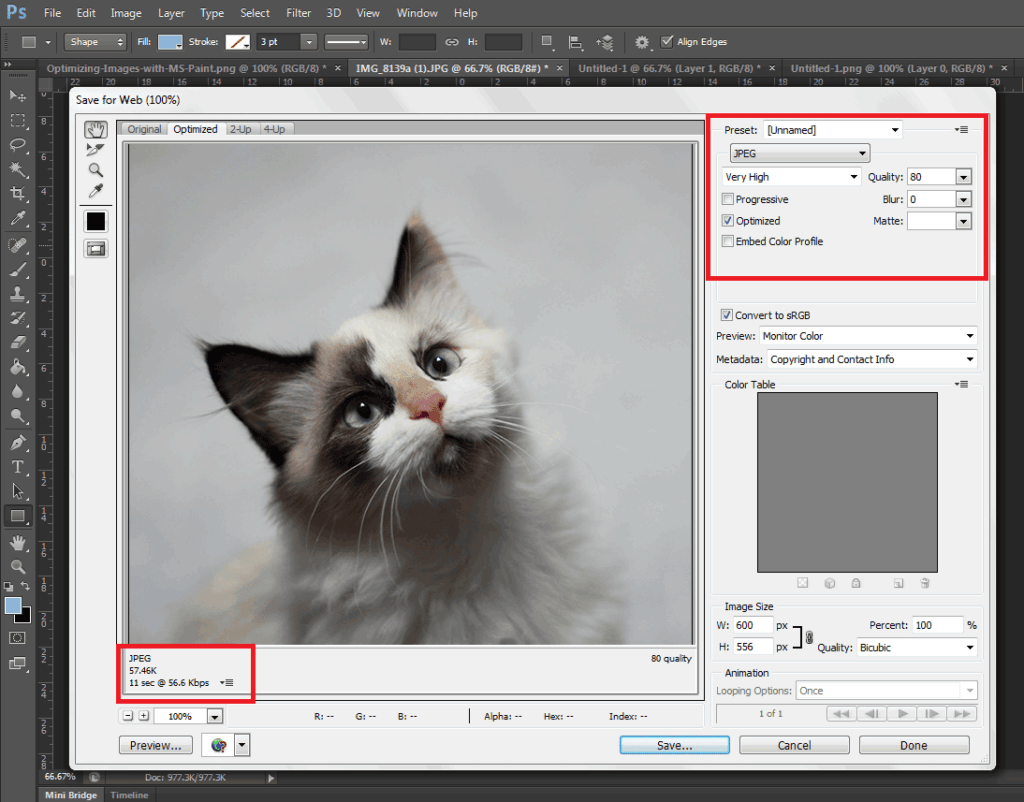
When you have resized your image to the appropriate resolution, click on File and Save for Web (Ctrl + Shift + Alt + S). Here you’ll be able to set the quality of the image while being able to see if the image still looks good. The image should not look pixelated and not have artifacts. In the bottom left section, you can see the file size of the image. You’re going to want to aim for an image that looks good, is not pixelated, and is less than 100kb in size — the smaller the size the faster the image loads on the page. On the upper right-hand section of the “Save for Web” window, you can use available presets or set the quality to your desired quality. Make sure you have the Optimized box is ticked and choose the correct file type. When you achieve a small file size with a good-looking image, click on Save.

Optimizing-Images-with-Photoshop

A Note on Image Types

image-file-types

An important thing to note to make images look good even as you scale them down is to set the correct file type. Notably, the JPEG type is used for photos as it supports the most number of colors at 16 million. PNG is the better choice if you’re working with graphics such as logos and icons since it makes use of lossless compression. Lossless compression means that the image can be made smaller without affecting quality. PNG supports thousands of colors as well as transparency. JPEGs don’t support transparency.

GIF images are similar to PNG. It uses lossless compression and supports transparency. It however can only store a measly 256 colors. Using GIF images on web pages is generally not recommended.

Serve Images in WebP Format

We also recommend converting your image files to the modern webp image file format since these are smaller in size and are thus recommended for achieving optimum site performance. Uploading webp files are still not recommended however as there are still devices and browsers that do not support it. There are however plugins and services that allow converting regular image file types to webp and serve these images when it is supported by the user’s device. WP-Optimize is one plugin that provides free webp conversion.

Optimize Images Using WordPress Plugins

We also recommend having an image optimization plugin installed on your WooCommerce store. There are many image optimization plugins to choose from such as EWWW Image Optimizer, reSmush.it, Robin Image Optimizer. Once you set up these plugins, they will optimize your images on upload. Do note, however, that these image optimization plugins will not alter image resolution so it is still recommended to upload images in the correct resolution not exceeding the image placeholder size.

Properly Naming Files

A thing to note when naming files is to name files as they are. Don’t name files after a keyword when it is not appropriate. If you’ve got an image of a child playing the violin, name it something like “child-playing-violin.jpg” and not something like “learn-violin-online.jpg” or “free-violin-course-online.jpg”. If you try to force your SEO keywords on your image file names, your site may be flagged for overoptimization.

Optimize your images to ensure your site performs well. A fast e-commerce website provides a good user experience which translates to better SEO rankings and improved conversion rates.

Filed Under: How-To Articles Tagged With: best practices, conversion optimization, how-to, image optimization, optimizations, page speed, photoshop, plugins, site speed optimization

How to Set Up WordPress SEO by Yoast for WooCommerce

March 26, 2015 By John Leave a Comment

How to Set Up WordPress SEO by Yoast

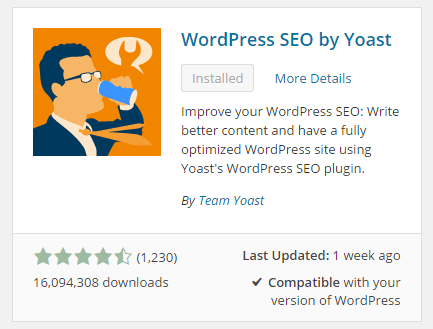
The WordPress SEO plugin by Yoast with over 16 million downloads is easily one of the best plugins that you need to have on your website. Whether it’s a personal blog, an e-commerce store, or a company website, you should have this plugin. In fact, many WordPress developers have WordPress SEO by Yoast in their list of plugins to install each time they create a new website. Many of you may already know a bit (or a lot) about SEO and that’s okay. That just means you’ll make better use of this plugin. And for those that don’t know much about SEO, don’t worry. The plugin is user friendly. I’ll walk you through all the functionalities so you’ll know how to set up WordPress SEO by Yoast for WooCommerce.

Installing WordPress SEO by Yoast for WooCommerce

To install the plugin, head over to the plugin developer’s website. Once there, download the plugin and upload it at the plugin page of your WordPress Dashboard.

You can search for the plugin on the plugin repository by going to your WordPress Dashboard. Click on “Plugins” and then “Add New”. From there just use the search bar to search for the WordPress SEO plugin and click on “Install Now”.

SEO Plugin Especially for WooCommerce

For WooCommercestore owners, getting the premium Yoast WooCommerce SEO plugin is a worthwhile buy. When used with the WordPress SEO plugin, you can better optimize your WooCommerce store. It enhances the existing Open Graph and Twitter Card enhancements in the WordPress SEO plugin. It will also optimize your sitemap for an ecommerce store setup, among other things. For a guide on how to set this up, check out this post.

Optimizing Product Pages for SEO for WooCommerce

The single most important function of the WordPress SEO plugin by Yoast is its ability to help you optimize your blog posts and pages for SEO. That includes WooCommerce products. WooCommerce products work just like posts/pages so it is the same procedure. So when I say page or post, the same applies to WooCommerce products.

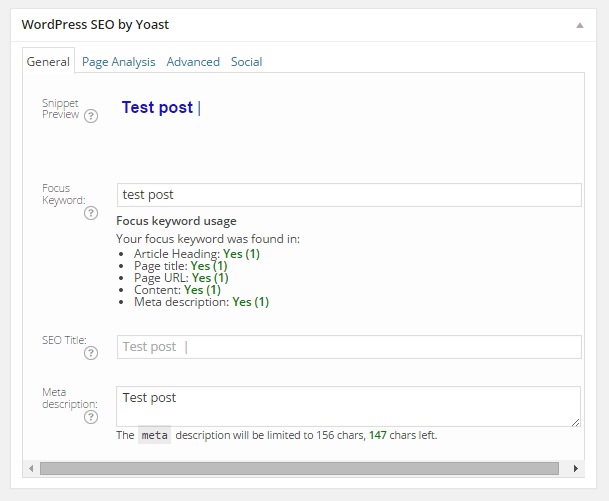
Optimizing posts/pages is easy enough. You can do it right after you finish creating the post/page in WordPress. When you’re on the post or page, just scroll down and there will be a section named “WordPress SEO by Yoast”. On the General tab, you’ll see a Snippet Preview. This is how your post/page will show up on the Google search results page. And the fun part is that you can edit how your post will show up. First off, you set a focus keyword. This should be the keyword that you want your blog post or page to rank for. What you should be aiming for is to have this focus keyword in:

  • the title of your article
  • in the body of the content especially in the first paragraph
  • and the meta description which you can set in the field where it says meta description

If you got that all right, you should be seeing all green below the focus keyword that you set.

post-optimization

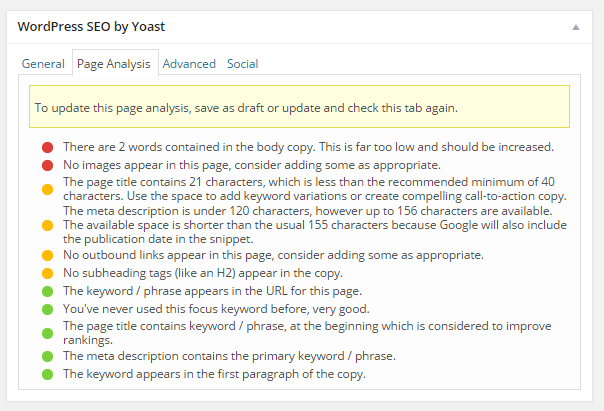
You can also click on the Page Analysis tab to get more information and other suggestions to improve your post/page. You don’t have to follow all the suggestions. But following everything will help increase the quality of your post/page.

page-analysis

You can tweak a bunch of other settings under the Advanced tab so feel free to change them as you see fit. You can even change how your post would appear when it gets shared on social media under the Social tab.

Optimizing WooCommerce Product Categories for SEO

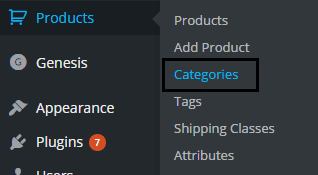
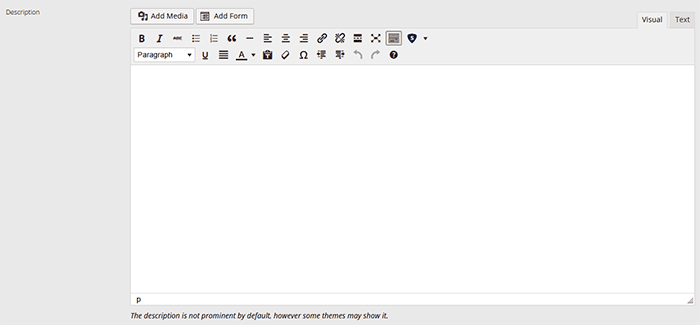
woocommerce-product-categoriesSimilarly, you can also optimize WooCommerce product categories for SEO. Just go to “Products” and click on “Categories” Edit the category that you want to optimize. When you scroll down to the bottom of the “Edit Category” page, you’ll see a section called Yoast SEO Settings. Fill in the SEO Title and SEO Description fields and click on Update.
optimizing-product-categories

Unlike when optimizing product pages, you don’t get to set a focus keyword. However, you can still target a keyword by including the keyword in the SEO Title and SEO Description fields. You should also put it in the Category Description field above the Yoast SEO Settings section.

Note that not all themes are able to display product category description on the category page but if your theme supports this function, the text that you put will appear on your product category page.

product-description

Verifying Your Website with Search Console

Verifying your website with different Google Search Console tools is important if you want your site crawled. It will have your website crawled by spiders. I don’t mean actual spiders. I mean search engine spiders that index websites on different search engines. Verifying with different webmaster tools can be a complex process but this is made easy with the WordPress SEO plugin.

Linking with Social Media Profiles

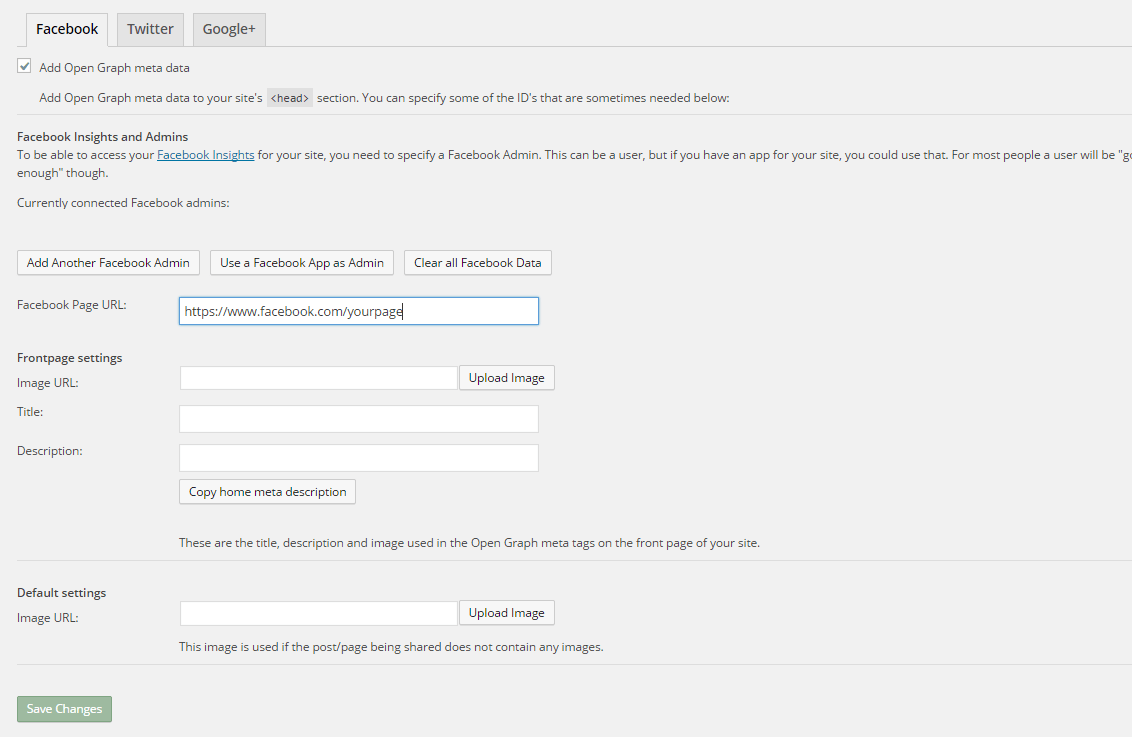
You can connect your website with your social media pages with the WordPress SEO plugin. You can do this by going to “SEO” and then clicking on “Social”. Here there are three tabs: Facebook, Twitter and Google+.

How to Connect Facebook

Linking Facebook to your site allows you access to Facebook Insights. If you already have a Facebook page, you just need to get the URL of your Facebook page. Copy the URL and then paste it where it says “Facebook Page URL”. You can then set the administrators for your page by clicking on Add Facebook Admin. If you are an advanced user, you can tweak a bunch of other settings. When you’re done, just click on “Save Changes”.

facebook

How to Set Up Twitter Cards

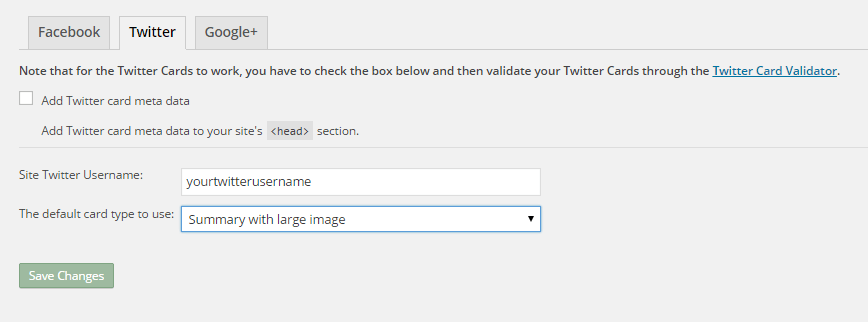
Do you use Twitter? Have you ever seen links in Twitter that show a snippet of the page that it links to? That’s called a Twitter card and you can enable that on your website using WordPress SEO. The usual thing is that enabling Twitter cards would call for you to add some lines of code to your header. But WordPress SEO eliminates the need for that.

twitter

How do you do this? On the Social section of the plugin, click on Twitter. Fill in your Twitter username on the appropriate field. Specify the kind of Twitter card that you want to have then click on “Save Changes”. You’re not done yet. You still need to confirm your Twitter card. Head over to this link. Specify the URL and click on “Preview Card”. After that, click on “Request Approval” and fill out the form. Finally, click on another “Request Approval”.

Soon, you’ll be able to see Twitter cards on your Twitter links.

The premium YoastWooCommerce SEO plugin will further help you optimize your Twitter Cards if you have that.

How to Connect Google+

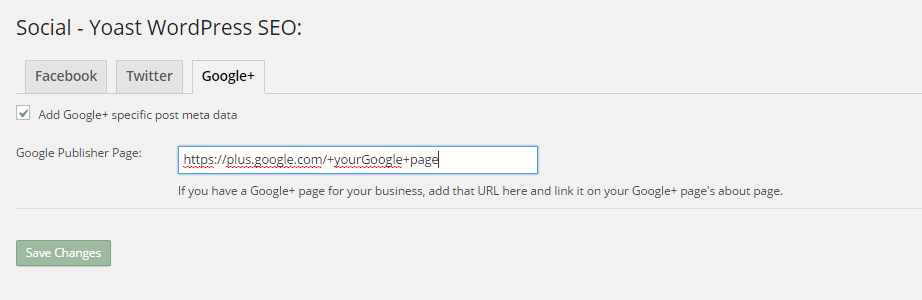
To connect your website with Google+ means setting your Google+ profile as the publisher of your content with the “rel=publisher” markup. “Rel=publisher” is an authorship markup which connects websites to Google+ pages (not personal profiles).

To connect your Google+ company page, head over to the “Social” section of the plugin and click on Google+. Fill out the field with the URL of your company page on Google+ and click on “Save Changes”.

google+

You might have heard of “rel=author” which links the content to the Google+ profile of the author. When implemented in the proper way, “rel=author” should show a snippet of the content with a photo of the author in the SERPs page. If you’re a writer and you’re hyped by that, I’d hate to burst your bubble but “rel=author” is no longer supported by Google. You can read more about it here.

Improving Sharing on Pinterest

Pinterest is another social media platform that’s worth mentioning. It has great potential for e-commerce stores. Why? Because Pinterest is image-based. The YoastWooCommerce SEO plugin makes sharing on Pinterest more worthwhile. After setting Twitter products and Schema Open Graph additions, your pins on Pinterest will start to show in a different way. In most cases, WooCommerce product will show up like posts. But with the plugin configured, your products will show up as “products”. They will show product related information such as price and variations.

Implementing Sitemaps with WordPress SEO

In a nutshell, sitemaps communicate with search engines to let the latter know when there are changes to the website. There are a lot of plugins that lets you create a sitemap. If you are already using the WordPress SEO plugin, just use the built-in sitemap module. Looking for another plugin just add an extra load to your server.

sitemaps

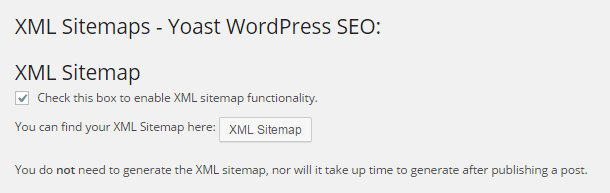
To get your sitemap, go to the plugin’s “XML Sitemaps” tab and then tick on the first box to enable sitemaps and click on “Save Changes”. There are a bunch of settings that you can tweak. You can have a look at them and change them as you please. They are pretty much self-explanatory.

You also might want to get the WooCommerce SEO plugin, which was mentioned above a couple of times. This removes some unnecessary bits from your sitemap in automatic fashion.

Check out our post on how to create a sitemap for your WooCommerce store to learn about sitemaps and other means of creating it.

Permalink Settings

Permalink settings all have to do with your URLs. I would not recommend changing any of the settings here but you are free to check them out and change them as you please.

Enabling Breadcrumbs with WordPress SEO

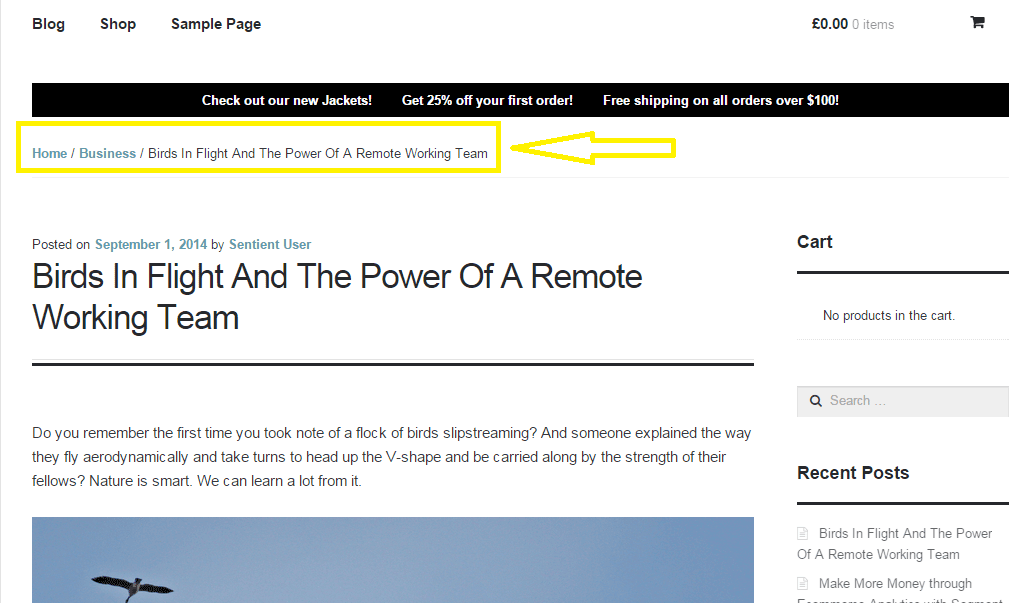
Breadcrumbs, when enabled, helps users identify where they are on your website. It also helps search engines determine your website’s structure. See the image below.  Where the yellow arrow is pointing at, that’s the breadcrumbs.

Enabling breadcrumbs on your website is simpler than snapping your fingers. Just go to SEO and then click on Internal Links. You should see a box that says “Enable Breadcrumbs”. So just tick that box and save. There are a few settings that you can tweak so just change them up as you need.

breadcrumbs

Did we miss anything? Or do you have any questions about the WordPress SEO plugin? Let us know in the comments.

Filed Under: How-To Articles, SEO For E-Commerce Tagged With: blog, breadcrumbs, content marketing, Google Webmaster Tools, Google+, how-to, navigation, optimizations, plugins, SEO tools, social media, Twitter, WooCommerce, WordPress, WordPress SEO, XML sitemap, Yoast

How to Add a Quantity Field on Your WooCommerce Shop Page

April 7, 2017 By John 30 Comments

counting-cubes-quantity-on-shop-page

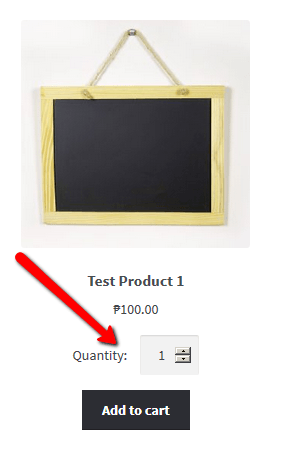
By default, WooCommerce does not allow users to change the quantity of the product on the shop page before adding to cart. To change the quantity, users would have to proceed to the cart page which can be an arduous process. In this post, we will show you how to add a quantity field on your WooCommerce shop page.

If a customer wants to buy three sunglasses, and you only have the “Add to Cart” button on the shop page, the user will have to go to the Cart to edit the quantity that he/she wants to buy. This takes a few extra clicks and can become a real problem if the customer wants to shop for more items.

Less Clicks to Checkout

It is important to note that less clicks leading to the checkout page leads to more sales. As an e-commerce store owner, making your store more profitable should be on top of your priority list. Another way to reduce clicks to checkout is allowing the customer to check out as guests without the need to create an account.

Also, refrain from asking unnecessary information. At the very least, your checkout page should only have the name, address, email and phone number fields aside from the payment details.

Quality of Life Improvement

Adding the quantity field to the shop page is a good quality of life improvement that many of your visitors would appreciate. Instead of having to navigate to the cart or the product page to increase the quantity, they can increase the quantity from the shop page. If you think about it, making it easier for your customers to purchase more of your products means more sales for you.

A Necessity for Some Online Stores

How to Add a Quantity Field on Your WooCommerce Shop PageAdding the quantity field to the shop page is a necessity to some stores where buying several pieces and having repeat sales are common. For example, buying canned cat food in bulk is common so if you own a store selling pet food, having the quantity field on the shop page will really help. Many of your customers will be buying again after some time. They can just add the products directly from the shop page since they know what they are buying and no longer need to see the product details.

How to Add a Quantity Field on Your Shop

You can use the Quantity Field on Shop Page for WooCommerce plugin to add a quantity field on your WooCommerce shop. Just install the plugin and activate it. There are no settings to tweak. Once the plugin is activated, the quantity field should be on your shop page.

Did this plugin work for you? Do you have any questions or ideas on how the plugin can be improved? Let us know in the comments.

Filed Under: How-To Articles, Theme and Plugin Reviews Tagged With: best practices, e-commerce, how-to, navigation, plugins, website development, Wooassist, WooCommerce

  • « Previous Page
  • 1
  • …
  • 3
  • 4
  • 5
  • 6
  • 7
  • …
  • 15
  • Next Page »
Let us support your online store so you can manage your business

Get started today

Get 2 Hours of FREE SUPPORT

We are so confident that you will love our services that we will give you your first 4 hours at a 50% discount

That’s 4 hours for only $75

BUY NOW

Free eBook

5 Things Every Online Store Can Fix On Their Website In The Next Week To Increase Sales

Quick Links

  • How it Works
  • Pricing
  • Blog
  • Contact
  • About Wooassist
  • My Account
  • Checkout
  • Privacy Policy
  • Cookie Policy
  • Terms and Conditions

Wooassist

Australia:
59 Luke St.
Hemmant QLD 4174

Philippines:
San Miguel St.
Poblacion, Iligan City 9200

Connect


Copyright © 2026 · Wooassist

Yours FREE!

5 Things Every Online Store Can Fix On Their Website In The Next Week To Increase Sales