Wooassist

Assistance for Your Woocommerce Store

  • How it Works
  • Pricing
  • Services
    • Site Maintenance
    • AI SEO and Content Marketing
  • Blog
    • How-To Articles
    • Code Snippets
    • SEO For E-Commerce
    • Theme and Plugin Reviews
    • Wooassist News
    • WordPress/WooCommerce News
    • Interviews
  • About Us
  • Contact
You are here: Home / Archives for how-to

Create Product Descriptions for Your Woocommerce Store

January 29, 2015 By John Leave a Comment

product-description

Product descriptions exist for one specific purpose – to sell.

Imagine a potential customer browsing through your ‘Products’ page. She finds the perfect pair of shoes and decides to purchase it. She clicks on the image only to find a poor product description, with no material details, instructions for sizing, etc.

She then hesitates and moves on to another website. That’s a lost sale right there, and the next buyer will go through the exact same thing. How many more customers will you lose?

Make it effective.

The goal is to make a visitor click all the way to check out form. To do this, your product descriptions should be effective and dynamic to engage customers. They have to know how your product or service can change their lives. And, they won’t be able to – unless they read the description.

An effective product description is one that goes beyond simply informing potential buyers about the product. It needs to convince them to buy it. Visitors of your website should feel the need to buy your products and/or use your services.

Make it unique.

Creating original content for your product descriptions is also a must. Don’t just copy and paste from the manufacturer’s brochures or website. Otherwise, you’ll have similar descriptions with hundreds of other websites – and this will affect your site’s ranking. What’s more, Google may penalize your website for this.

Tell a story with your descriptions. Make it about the customer and how your product can help him. Also, be careful about your voice.

Don’t make it sound boring, or as if you are lecturing in the course of telling your story. Try and be personal with your voice and make it seem like you’re talking to a friend. Learn more about the voice you need to use.

Make it sell.

In the competitive e-commerce landscape, good product descriptions can give you an edge. You can even learn how to write your own. There is no need to be fancy about it. In fact, a simple approach is the best, as shown here.

You need to find the time to write them even though you’re busy with other aspects of growing your business. This useful resource can help you learn the secrets of creating product descriptions to help you find success.

So there you go. Tell the world about your products. Use stories and read about the resources mentioned above to guarantee that you are going to get results. However, if you feel that you are not up to it and need to put your focus elsewhere, our Wooassist team can help.

At the very least send your supplier’s descriptions to Wooassist and we will re-word them to make them unique.

Filed Under: How-To Articles Tagged With: admin, content marketing, copy writing, duplicate content, how-to, product management, WooCommerce products

How to Edit Footer Credit Text in Storefront Theme

March 20, 2017 By John Leave a Comment

Like most themes, Storefront theme comes with a generic footer text. As a WooCommerce store owner, this doesn’t really help your site so you will want to change it.

Storefront-Default-Footer

Why Edit Footer Credit Text Area?

Well, you certainly wouldn’t want the default one. You can edit your site footer credit text area to include your business name and declare your copyright. You can also use this area to include whatever best fits your needs.

But first off…

How Do You Edit the Edit Footer Credit Text in Storefront Theme?

By editing your e-commerce store’s footer, you can make it a part of your strategy. You can easily edit it if you know how to code. However, this can prove challenging to the average user. In this case, there’s a plugin for that. Just follow the steps below:

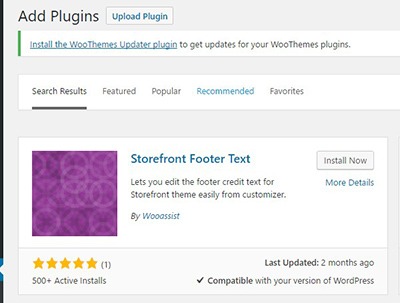
  1. Storefront-Footer-Text-Plugin-400x300Head over to your WordPress Dashboard and go to plugins

  2. Click on “Add New”. In the Search field, input “Storefront Footer Text” and press Enter.
  3. Click on ‘Install Now’ on the plugin and then click Activate.
  4. Once Activated, head over Appearance > Customizer
  5. Under the Footer section, you will find a text area for you to enter your custom credit text. You can use HTML tags so you can be creative when adding your footer text.
  6. When you’re done, just click on Save.

What Can I Add to My WooCommerce Store’s Footer Credit Area?

There are a lot of things you can add to your store’s footer credit section. Below are just some of them.

Declare Copyright and Other Important Declarations

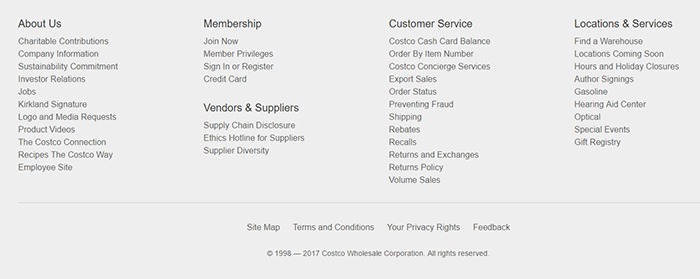
The most common use of this area is to declare a copyright. This has three elements: the copyright icon, the company name and the year that you started the e-commerce store/business up to the current year.

If there are other important declarations that you want to add for legal purposes, you can add them in this section as well. Some websites have been known to use this area to declare the use of cookies.

Declare-Copyright-in-Footer

Here’s how it looks like on the Costco website.

Contact Details

In addition to copyright information, you can add your contact details on the footer credit section to increase your credibility. You can add your phone number, address, email as well as a link to your contact us page.

Social Media Icons

You can add social media icons in this section in a way that is not intrusive. When you add social icons at the top of your page, it can be a distraction from your website’s goal. But when you add it at the bottom of your site, it becomes another way for you to engage with your visitors if they ignored your main call-to-action.

Social-Media-Icons-in-Footer
Newegg.com adds both social icons and security seals in the footer credit area.

Show Security Seals and Certificates

Newegg.com adds the security seals on their footer credit section along with their social media icons. You can add your own Norton Security Seal here.

Payment Options

You can also add icons of the payment options that you accept on your e-commerce store. This makes it easier for your visitors to know what payment options you accept without having to look for the FAQ section.

Add Other Important Links

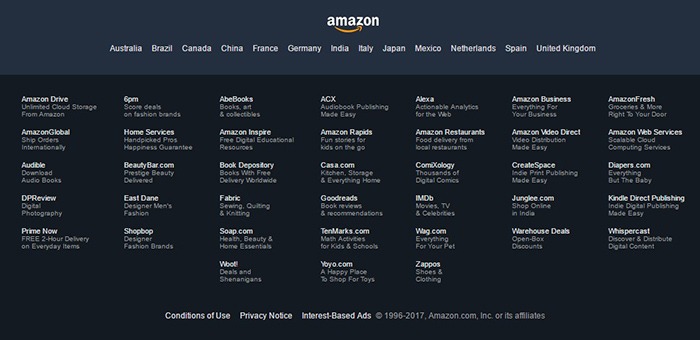
You can also use the footer credit area to add other important links such as your terms and conditions and privacy policy. This is how Amazon does it.

Terms-Conditions-Footer

No matter what you put on your footer credit text area, it must be an element that helps you achieve your e-commerce store’s goals.

Did this plugin help you edit footer credit text in Storefront? Did you experience any problems using it? What elements did you add to your footer credit area? Let us know in the comments.

Filed Under: How-To Articles, Theme and Plugin Reviews Tagged With: best practices, design tweaks, e-commerce, how-to, navigation, plugins, Storefront, Wooassist, WooCommerce

Things to Do Before Your Website Goes Live

May 7, 2015 By John Leave a Comment

checklistThe bulk of the work is done. Your website is ready to go live. But are you sure it is really ready? Here’s a handy checklist of things to do before your website goes live. Make sure everything is working fine before you click that “Go Live” button.


Page Content

  1. Proof read web copywriting, spelling and grammar are correct
  2. Paragraphs and headers and formatting are correct
  3. Copywriting date on the footer shows current year
  4. Company details and contact info are accurate all throughout the website.
  5. Lorem Ipsum has been removed
  6. Images, videos and audio files are properly formatted and are working on different devices
  7. Premium content such as PDFs, whitepaper, ebooks, etc. have been proofread, spelling and grammar are correct. These files are properly stored in their respective libraries.
  8. Images, font and other content are properly licensed or have proper citation

Design

  1. Site pages are compatible across different browsers (Firefox, Safari, IE 7, 8, 9, and 10, Chrome, Opera)
  2. Pages are compatible across different devices (tablets, laptops, desktops, and other mobile devices)
  3. Check for CSS and HTML error, fix and validate
  4. Favicon is uploaded and is rendering properly
  5. Paragraph and styles are working properly

design

Functionality

  1. Forms are submitting data properly
  2. Thank you message or confirmation message displays after the form is submitted.
  3. Form data is emailed to the recipient
  4. Auto-responders (if any) are working properly
  5. Internal links are working
  6. External links are working
  7. Social media icons are working properly
  8. Feeds are working properly
  9. Company logo is linked to the homepage
  10. Site load time should take not more than 2-3 seconds
  11. 404 Redirects are in place
  12. Integration with third-party tools such as e-commerce software, CRM, Marketing software platforms are running smoothly
  13. Site structure is clean and should be easy to navigate and maneuvered by your users
  14. Payment processing should be live
  15. Shipping options checked
  16. Credit card transaction checked
  17. Run a test order. Check tax, sub-total, total, coupons, etc
  18. Confirm order is placed
  19. Reset order number
  20. Verify MyAccount
  21. Dummy orders and test accounts are cleared.
  22. Test email from client to merchant
  23. Cart icon is on each page
  24. Checkout button should be large and is strategically located on the page.
  25. Search box with suggestive search
  26. Feedback tab at the bottom of each page for users to notify the webmasters when having problems with the site.

SEO

  1. Page titles should be unique, less than 70 characters and should include keywords.
  2. Meta Descriptions are unique and should not exceed 156 characters
  3. Keyword per page not more than 10, depending on the # of words per page
  4. Metadata for RSS in place
  5. Metadata for social media sharing in place
  6. Metadata spelling and grammar correct
  7. Alt tags for images
  8. Dynamic XML sitemap created and submitted to search engines
  9. Breadcrumbs in place
  10. Slugs should reflect site structure and should be short with relevant keywords.
  11. 301 redirects for old URLs are in place
  12. rel=”nofollow” tags are in place on applicable links and pages
  13. Site indexing is on

Google Analytics

  1. Analytics codes are properly inserted
  2. Relevant IP addresses have been excluded from analytics tracking.
  3. Google Webmaster Tools and Google Analytics are synced
  4. Google Adwords and Google Analytics are synced

Security and Backups

security

  1. Monitoring scripts installed.
  2. Copy of the final website stored in a safe place
  3. Ongoing copies of the site is being generated everyday (depending on how large the site is)
  4. Usernames and passwords stored in a secure database
  5. Check robots.txt file to restrict access to sensitive pages

Compliance to Web Rules and Regulations

This may vary depending on the country and industry.

  1. Pages offer accessibility to users with disabilities
  2. Users need to be informed if site is using cookies
  3. Compliant to usage rights of images, fonts, videos, etc.
  4. Terms and Privacy policy for users should be readily accessible and visible to site visitors
  5. Website is PCI compliant
  6. SSL certificate properly installed. Check receipt and checkout page, my account and my account details in SSL mode.
  7. SSL mode for logins and registrations

Filed Under: How-To Articles Tagged With: 404 error, backup, best practices, breadcrumbs, Google Analytics, Google Webmaster Tools, how-to, redirection, security, SEO strategy, website development, WordPress

How to Create a Child Theme for Storefront

February 26, 2016 By John 2 Comments

how-to-create-a-child-theme-for-storefront

Optimizing your website usually means making changes to your theme. These changes can range from simple to complex. It’s easy to make changes on your website but the problem is that you will lose all your changes when you update your theme.

There are ways to update your theme without losing your customizations and the best way is to use a child theme. In this post, we will teach you how you can use a child theme to make the website development process easier.

We’ll teach you how to create a child theme for Storefront theme. Storefront is the official theme for WooCommerce. It’s a good parent theme to work on as it’s built with the same high standards as WooCommerce. It is entirely free and 100% compatible with WooCommerce.

What is a Child Theme

A child theme is not a full theme. It only inherits all the code, styling and functionality of the main or parent theme. Changes made in a child theme do not affect the parent theme. This allows users to tweak a theme without having to worry about losing the customizations when updating the theme. Using a child theme is best practice for altering an existing theme.

A parent theme is the default of all your WordPress themes. It contains the templates, design and functionality needed to run your website on WordPress. Note that parent themes are different from theme frameworks. A parent theme is a complete theme that you can use right away while a theme framework like Genesis is a developmental template.

Why You Should Use a Child Theme

There are thousands of themes out there that you can use for your WordPress installation. The problem is they all look generic and may not exactly fit your website needs. Modifying the theme with CSS is recommended. Here are some reasons why you should use a child theme:

Speed Up Site Development

Child themes allow you to quickly add or modify specific functions or template files. It allows you to significantly speed up site development as you would not need to write a lot of code from scratch. You’ll get a great deal of flexibility especially from powerful theme frameworks like Genesis.

Preserve Theme Changes

Themes get updates from time to time. These updates are important as these address security exploits that come to light. Updating your theme will wipe all the changes you made to the base theme. However, if you use a child theme, you can preserve any changes you make to the child theme when you update the base theme.

Safe Fallback

Creating or editing a theme entails a lot of work. However, when you make customizations on a child theme, you have your parent theme’s codes and functionality as fallback in case you mess up something. The child theme will only change a specific function or style when you want it to.

Secure Your Site

WPBeginner found out that 83% of hacked WordPress sites are not upgraded properly. The safest way to update your theme is by using a child theme.

When to Use Child Themes

If you are in any way customizing your theme, then you should be using a child theme. Using a child theme is best practice.

If you are not familiar with CSS and PHP, creating your own child theme can be a challenge. You would also need to learn about the functionalities of your parent theme.

Robust frameworks can be more challenging as they have their own filters and hooks.

How to Create a Child Theme

Setting up a child theme for any WordPress theme is easy but you need to pick a good parent theme. Not all themes can be good parent themes. We recommend Storefront or the Genesis framework.

A good parent theme is a solid foundation for your site. You will be building your child theme over it so it has to be flexible and coded properly.

You can use plugins to generate a child theme or you can do it manually. You just need three things to start: child theme directory, style.css file and functions.php file.

Child Theme Folder

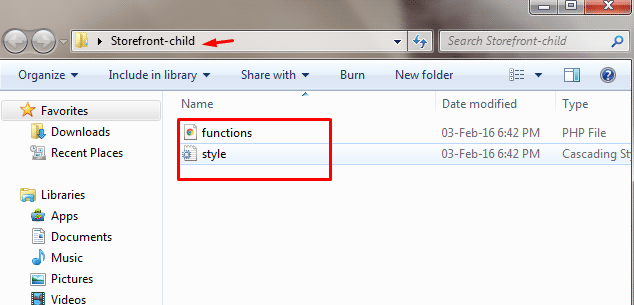
This folder will serve as the container for your stylesheet and function files. It is ideal to use the name of your parent theme as folder name and append it with “-child”. In this case, we named our directory “Storefront-child”. Make sure that your child theme’s directory name has no spaces to avoid possible errors. For the meantime, you can create this folder in your computer.

child-theme-folder

Child Theme Stylesheet

This is a basic style.css file. You need to set this stylesheet to inherit the styles from your parent theme. To do that, insert the stylesheet header below and replace them with relevant details. Note that customizations done here will override parent theme styles.

/*
 Theme Name:   Storefront Child
 Theme URI:    http://sitename.com/storefront/
 Description:  Storefront Child Theme
 Author:       Nick J
 Author URI:   http://sitename.com
 Template:     storefront /*this is case sensitive*/
 Version:      1.0.0
 License:      GNU General Public License v2 or later
 License URI:  http://www.gnu.org/licenses/gpl-2.0.html
 Tags:         light, dark, full-width, responsive-layout, accessibility-ready
 Text Domain:  storefront-child
*/
/*Theme customisations start here*/

We won’t teach you how to use CSS. It is impossible to cover that in one article. You can learn CSS here or have a developer do the CSS tweaks on your website.

Child Theme Function

Previous methods suggest that you use “@import” in your stylesheet to load your child theme. This is no longer considered best practice. You just need to “enqueue” your parent theme’s stylesheet in your child theme’s functions.php file. To do this, you can use “wp_enqueue_scripts action” and use “wp_enqueue_style()”.

The stylesheet for your child theme is usually loaded automatically. If not, you will need to enqueue it as well. You also need to make sure that the child stylesheet gets priority. You can use the code below instead. This code sets ‘parent-style’ as a dependency so your child-theme stylesheet loads after it.

<?php
function theme_enqueue_styles() {
$parent_style = 'parent-style';
wp_enqueue_style( $parent_style, get_template_directory_uri() . '/style.css' ); wp_enqueue_style( 'child-style', get_stylesheet_directory_uri() . '/style.css', array( $parent_style ) ); } add_action( 'wp_enqueue_scripts', 'theme_enqueue_styles' );
?>

Activation

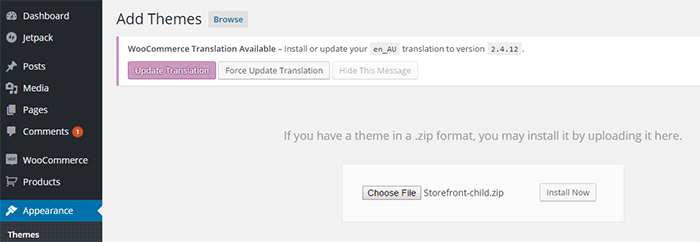
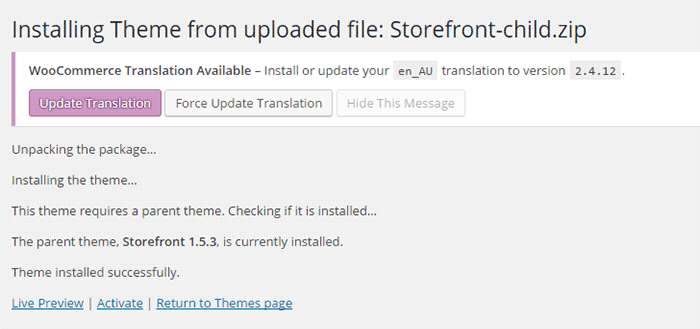
To add a child theme to your WordPress themes, you need to create a .zip file of your child theme folder. You can use 7-zip or Winrar to do this. Make sure that you have your style.css and functions.php inside your child theme folder.

It is best to take note and keep records of other plugin settings before you activate your child theme. Once you’re done, you can upload this in your WordPress via Appearance > Add Themes.

child-theme-activation-storefront

WordPress will install your child theme just like any other theme. Once installed, you need to activate this by clicking on ‘Activate’.

child-theme-activation-storefront-2

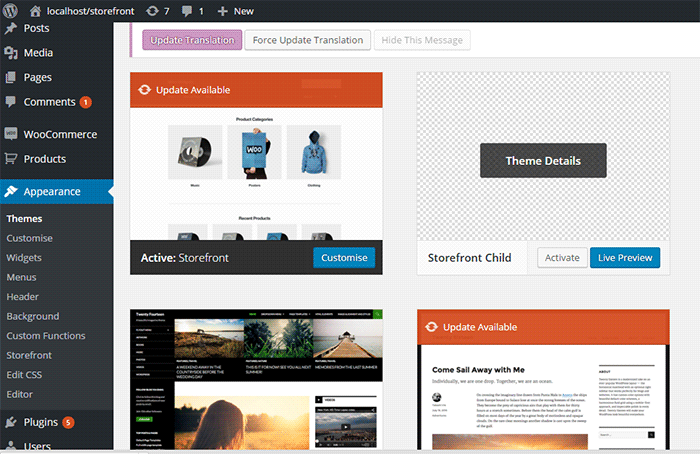
You can also choose to activate your child theme later when you go to Appearance > Themes.

child-theme-activation-storefront-appearance-themes

Once installed or activated, you can apply any edits to functions.php and to the stylesheet directly on the child theme files

Popular Child Themes for Storefront

If creating your own child theme is proving to be a bit too difficult for you, you can always purchase one.

There are a handful of child themes for Storefront right now. Note that you should install Storefront base theme first before installing these child themes.

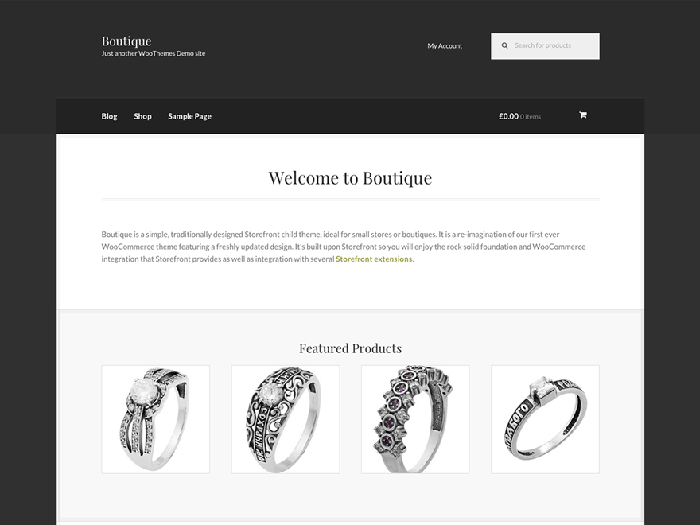
Boutique

boutique_popular-child-themes-for-storefront

Boutique is simple and easy to customize. You can start selling after you create your color theme, add your logo and content.

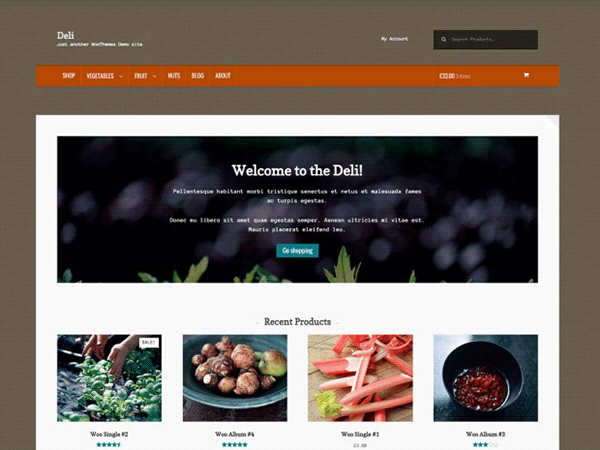
Deli

deli_popular-child-themes-for-storefront

If you want to add more personality to your store, you can use Deli. This child theme is great for small businesses. It has color schemes and textures that are inspired by nature.

Conclusion

Having a child theme is best practice when doing development work on your WooCommerce site. More importantly, using a child theme allows you to freely update your theme without losing any customizations you made on the child theme. A good and solid foundation is important for child themes. Hope this article has been helpful. Do you have any questions about child themes or anything you’d like to add? Let us know in the comments.

Filed Under: Code Snippets, How-To Articles Tagged With: best practices, child theme, code snippet, CSS, design tweaks, how-to, optimizations, Storefront, website development, website maintenance, WooCommerce, WordPress

How to Fix Checkout Problems in WooCommerce

June 6, 2016 By John 84 Comments

how to fix checkout problems in WooCommerce

One of the biggest problems a WooCommerce store owner can encounter is when the checkout fails. There are a lot of different types of issues that could happen during checkout, but these can be fixed easily if you can identify what is causing the problem. However, finding out the cause is not always easy for the average user. In this post, we will teach you how to fix the common checkout problems in WooCommerce.

The information in this post may or may not help with the specific problem that you are experiencing with your checkout. You may have a similar problem but the source could be different, hence the solutions mentioned here may not work for everyone. It is best to have a developer adept in both WordPress and WooCommerce make the suggested fixes for you. We also recommend that you create a staging/development site and do your debugging there rather than on the live site.

Most Common WooCommerce Checkout Issues

Here at Wooassist, a lot of new clients come to us with problems on their checkout. Having issues on the checkout page can be daunting as it can be difficult to figure out the cause. The checkout page is crucial because it is the last page of the “user shopping experience”. A simple error that could be fixed in a few minutes can hurt your business if it is not addressed swiftly. You could end up losing business opportunities and customers. To fix the problem, we need to figure out what the error is first.

Below are some common issues we encounter that you could be experiencing right now on your WooCommerce store.

Checkout Page Isn’t Available and is Just Redirecting Back to an Empty Cart

cart-is-currently-empty

While there are many reasons why checkout would redirect to an empty cart, it’s usually because your hosting is not totally compatible with WooCommerce.

The issue is most common with stores that enabled “force https on checkout”. In this case, the issue could be caused by a PHP security module called Suhosin. WooCommerce already has an official fix posted for this.

Simply paste the code below in your server’s PHP settings.

suhosin.session.cryptdocroot = Off

Review Order Section is Stuck on Loading

review-order-session-stuck-on-loading

When a customer enters their shipping/billing information, this triggers a script to reload the review order data. When there is an error in the script, it will just get stuck without an error shown that would’ve helped you understand what’s happening.

This usually happens when the returned data is not what WooCommerce expects. This is caused by either a plugin or template conflict. To fix this, you will need to check compatibility with all plugins installed and update any outdated WooCommerce templates.

Payment Option is Not Working

Some popular payments options are PayPal, Stripe, Authorize.net and eWay. These are the services that you’ve installed in your store to handle the payment process between you and your customers. This is the page where users enter their credit card information and hit the “place order” button.

Here are some scenarios where the payment option does not work:

Payment option is not available on checkout

You are sure that you have completely configured your payment option but it’s not showing up on the checkout page. This usually happens with stores that don’t have an SSL certificate installed and the payment option requires one. You can learn more about SSL in this post.

Authentication error pops up

When an authentication error pops up, this means there is something wrong between the connection of your store and your payment option service provider. To fix this, check that the credentials you entered in the payment option’s settings are correct.

Unknown error pops up

Checkout-unknown-error

Unknown error popping up could mean that a PHP script in WooCommerce isn’t working properly. There are many things that could cause this. It may be due to a plugin conflict, or your hosting doesn’t support the custom AJAX endpoints utilized by WooCommerce. To fix this you will need to check each plugin installed. Try disabling the plugins one at a time and see if that fixes your problem.

Nothing happens after clicking “Place order” button

If nothing happens when you click the place order button, then most likely there is a JavaScript conflict in the checkout page. The best way to fix this is to check your browser’s console to see which scripts are in conflict. You’ll want a developer to do this for you though.

Did any of these help solve your checkout page problem? If you have any other problems with checkout on your WooCommerce store, you can hit the comments or contact us and we’ll see what we can do for you.

Filed Under: How-To Articles Tagged With: best practices, checkout form, code snippet, how-to, security, website maintenance, WooCommerce

  • « Previous Page
  • 1
  • …
  • 4
  • 5
  • 6
  • 7
  • 8
  • …
  • 15
  • Next Page »
Let us support your online store so you can manage your business

Get started today

Get 2 Hours of FREE SUPPORT

We are so confident that you will love our services that we will give you your first 4 hours at a 50% discount

That’s 4 hours for only $75

BUY NOW

Free eBook

5 Things Every Online Store Can Fix On Their Website In The Next Week To Increase Sales

Quick Links

  • How it Works
  • Pricing
  • Blog
  • Contact
  • About Wooassist
  • My Account
  • Checkout
  • Privacy Policy
  • Cookie Policy
  • Terms and Conditions

Wooassist

Australia:
59 Luke St.
Hemmant QLD 4174

Philippines:
San Miguel St.
Poblacion, Iligan City 9200

Connect


Copyright © 2026 · Wooassist

Yours FREE!

5 Things Every Online Store Can Fix On Their Website In The Next Week To Increase Sales