Wooassist

Assistance for Your Woocommerce Store

  • How it Works
  • Pricing
  • Services
    • Site Maintenance
    • AI SEO and Content Marketing
  • Blog
    • How-To Articles
    • Code Snippets
    • SEO For E-Commerce
    • Theme and Plugin Reviews
    • Wooassist News
    • WordPress/WooCommerce News
    • Interviews
  • About Us
  • Contact
You are here: Home / Archives for website maintenance

Why is it Important to Keep Your PHP Version Updated?

December 18, 2020 By John 4 Comments

The WordPress ecosystem is built on the PHP programming language. PHP is continuously being developed to improve security and make code execution faster among many other improvements.

PHP End of Life

At some point, a version of PHP will become obsolete which is referred to as the “end of life” of that version. This means that version of PHP will no longer receive any security fixes.

Unfortunately, many websites are still running on outdated PHP versions. All these websites are at risk.

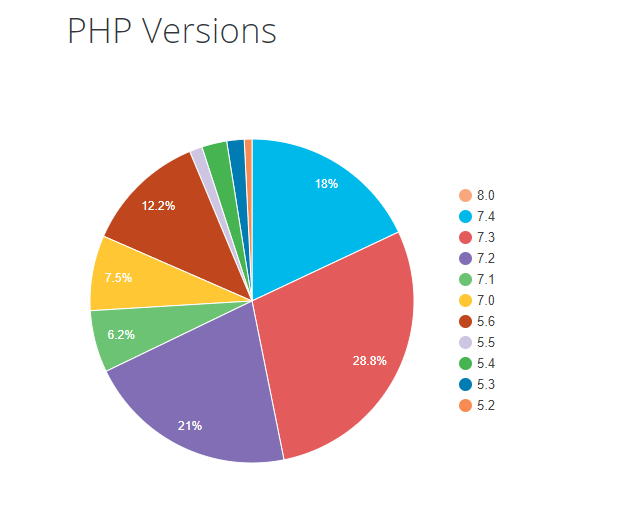
According to WordPress statistics, 18.5% of WordPress sites are still running on PHP 5.6 or lower. Support for PHP 5.5 ended on December 2018. Another 34.7% of WordPress sites are running PHP 7.2, 7.1 and 7.0. Support for PHP 7.2 ended November 20,2020. That would make 53.2% of WordPress sites vulnerable to PHP exploits.

WP PHP versions
Source: WordPress.org

Why are Majority of WordPress Sites Running Outdated Versions of PHP?

Many users most likely don’t even know what PHP version they have since updating it is more complex than updating themes and plugins. Many non-technical WordPress users are wary of touching their hosting settings or cPanel. And for good reason. one wrong click on cPanel could cause your site to go down if you don’t know what you are doing. This seems to be the biggest barrier to adoption of newer PHP versions.

Some hosts are also slow to adopt and offer newer PHP versions. We recommend WPEngine and Siteground as they are quick on the uptake when it comes to PHP version offerings.

Why You Should Update

Better Security

The main reason that you should update your PHP is for security. As we have already mentioned, older PHP versions are no longer getting security fixes. That means known vulnerabilities are not being fixed on that version which leaves your site open to attacks.

Site Speed

Newer PHP versions will execute code faster so that means faster page load speeds. Faster page load speed means better user experience and good SEO signals. Site speed is an SEO ranking factor. So if you want to hit page one of Google search results, invest in site speed.

Ongoing Support

If you are running the latest PHP versions, you are protected from the latest known vulnerabilities. People work to fix security vulnerabilities in PHP when they come to light. The same goes for known bugs.

How Do You Check Your PHP Version?

Now you’re curious how to update your PHP version. First off, you have to find out what version of PHP you are using. There are several ways to check your PHP version. You can actually check on your WordPresh Dashboard.

Site Health Page

The Site Health page that you can access from your WordPress Dashboard contains a plethora of useful information that you can address to keep your site secure. You can reach it by going to Tools and then clicking on “Site Health”. Or you can just append your domain with:

/wp-admin/site-health.php

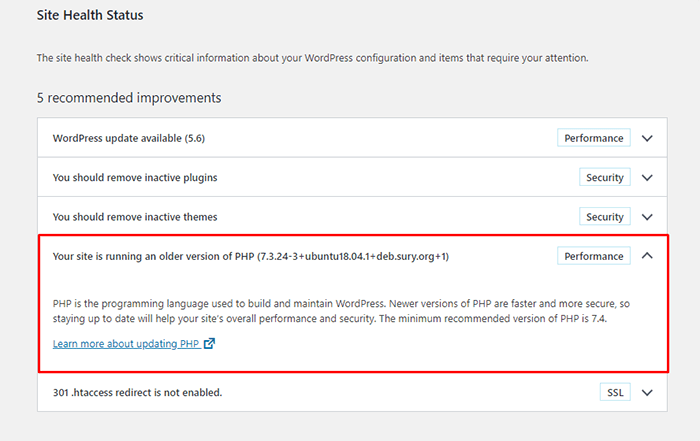
WooCommerce Status Page

If you are using WooCommerce, you can also click on WooCommerce and then on Status. You can see your PHP version when you scroll down to the “Server environment” table.

woocommerce PHP version

There are other ways to view your PHP version but these are the easiest methods for WordPress users.

You Know What Version of PHP You are Running, Now What?

If you not running an outdated version of PHP, then you don’t need to do anything. If you find that your PHP version is outdated, there are a few things you need to do before you update your PHP version.

  1. Create a staging environment. You can test all your updates here before updating your live site. You will, essentially, also need to test the PHP upgrade on a staging environment so this is a necessary step.
  2. Create a backup of your site.
  3. Update your WordPress core.
  4. Update all your themes and plugins. If you are using premium themes and plugins, make sure you have an active license for everything so you can receive automatic updates.
  5. Remove unused plugins.
  6. Find and remove abandoned plugins. This could get complicated if your site relies heavily on an abandoned plugin. We have a separate guide for removing abandoned plugins.

Now You’re Ready to Upgrade Your PHP

We recommend letting a developer upgrade your PHP version in case something goes wrong or at least have a developer at your beck and call before you proceed.

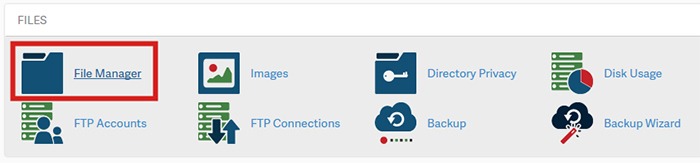
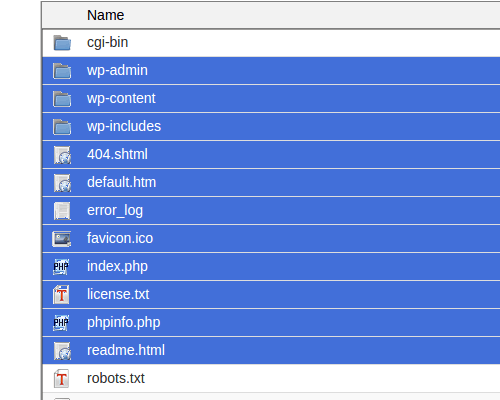
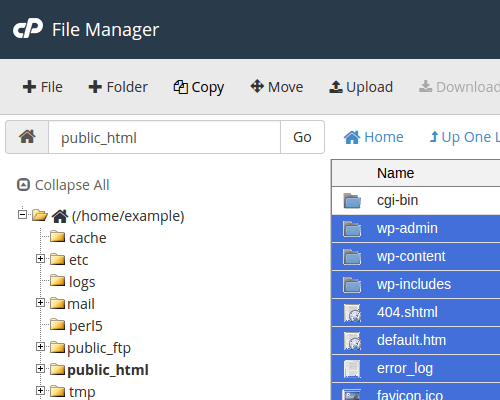
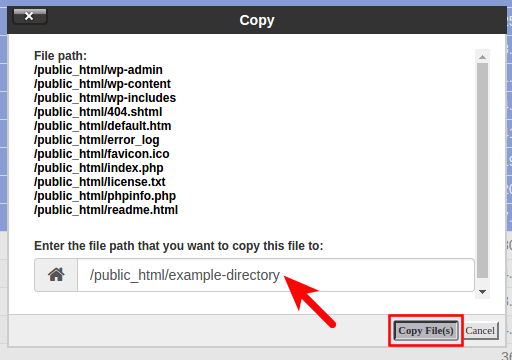
How you upgrade your PHP depends on your hosting provider so you should consult your hosting provider’s documentation. You will most likely need to navigate cPanel or your hosting account’s dashboard. Some hosting providers will actually require you to create a support ticket to request a PHP upgrade.

Make sure you are testing the PHP upgrade on a staging environment first so you can sort any issues in a controlled environment.

Have your hosting provider’s contact information at the ready so you can reach out to them right away if you encounter a problem.

If you need technical help with any of the steps leading to the PHP upgrade or the actual upgrade, you can contact us.

If you have any questions, you can also let us know in the comments.

Filed Under: How-To Articles Tagged With: security, site speed optimization, website maintenance, WordPress updates

13 Routine Maintenance Tasks that You Should Do on WordPress and WooCommerce

April 2, 2018 By John Leave a Comment

Routine Maintenance Tasks for WordPress

Maintaining a WooCommerce store is a lot of work. There are a lot of routine maintenance tasks for WordPress and WooCommerce that need to be done on a regular basis. In this post, we list down the most important tasks that you should do on your WooCommerce store.

1. Create Regular Website Backups

Create Regular Website BackupsCreating regular site backups is critical. It is your first fallback in case something breaks on your site. While you can make backups manually, it is important to make regular automated backups. Check with your hosting provider if they create regular backups of your database as well as a complete backup of your site. You can also install a backup plugin such as Updraft Plus or BackWPup and set it up to make regular automated backups for you. We still recommend creating manual backups before doing major work on your WooCommerce store though.

2. Update WordPress, WooCommerce, Themes and Plugins

Updating all elements of your WooCommerce store should be done on a regular basis. Do this weekly if you have the time. If not, monthly updates are good enough. Updates include updating WordPress Core, themes, WooCommerce and all other installed plugins. Remember to backup up your site before proceeding with updates since updates could cause your website to break. If you have a development site, it would be best to test the updates first on this staging environment. Then, do some user testing to make sure that there are no errors. After that, you can proceed to update your live site. When that’s done, you will need to do another round of testing. Some important elements to test include checkout, add to cart, contact form emails, opt-in forms and other customizations that were done on the site.

3. Update WooCommerce Template Files

After updating WooCommerce, you will sometimes get an error notifying you of outdated WooCommerce template files. This just means that your theme has not updated to include the latest WooCommerce template files. In some cases, this could cause some formatting issues on your store. If there are no errors on your store, you can simply wait for your theme to release an update that includes the most recent template files. Or you can also fix this manually by following the steps in this documentation from WooCommerce.

4. Change User Passwords

It is important to use strong passwords. However, it is just as important to change passwords on a regular basis. There are times when security breaches can go undetected for a long time. Changing your password regularly blocks out these security breaches that you might not realize are there. You should change your password for WordPress admin, FTP, database and cPanel. And a pro-tip, never use “admin” as your username. This is the first username that hackers try out when brute forcing into websites.

5. Optimize Your Product Images

We’ve always emphasized the importance of optimizing images for your WooCommerce store to keep your site running fast. If you have uploaded any product image that is more than 100KB in size, it might be a good idea to replace that image with an optimized product image. To learn more, you can check out our blog post on how to optimize images.

6. Approve and Respond to Product Reviews

Moderate Product ReviewsIf you are not asking your customers for product reviews then you might want to reconsider. Most people who buy online look for product reviews before they decide to purchase something. One study found that 85.57% of users read reviews before they purchase. And if you are asking your customers for product reviews, then you will need to approve reviews on a regular basis. A word of advice, do not remove negative reviews of your products. Instead, make it an avenue where you can show good customer service. Respond to the negative review. Offer a replacement for a defective product or offer a refund. People reading reviews will want to see some negative reviews to get a well-rounded picture of your product. When moderating reviews, you only need to remove the spam reviews.

7. Approve and Respond to Blog Comments

If you have a blog that is made to drive customer engagement, then your blog will most likely attract comments. Same with product reviews; don’t delete the negative comments. Rather, address them positively. Remove any spam comments as this will negatively impact the user experience of your blog. If you are using Akismet: Anti Spam plugin, this will block out most spam comments. However, some spam comments can still get through and you will need to manage them manually.

8. Test Your Contact Forms and Email Opt-in Forms

Every now and then, you will need to make sure that your contact forms and email opt-in forms are working. Just fill in your forms and send. If you receive it in your email, then you’re all good. But if you don’t, there’s something wrong and you need to do something about it. Have your developer look into it.

9. Optimize Your Database

Over time, your database accumulates a lot of gunk and you need to clean it to make sure your website runs fast. Before you go about this task, make sure you create a backup. You can choose to clean your database manually if you are comfortable and familiar with working on your database. Otherwise, you can use a plugin to do the optimizations for you. Notable plugins include WP-DBManager and WP-Optimize. You can check out our guide on how to clean your database.

10. Test Your WooCommerce Store’s Speed

If you have not yet made optimizations to your WooCommerce store’s speed, you should consider doing it now. Site speed has become increasingly important for WooCommerce store owners. Google now considers site speed as a ranking factor for SEO. Also, if you have a slow site, this will negatively impact the customer’s experience on your site. It is easy for your customers to buy instead from your competitors. You can test your site speed on Google’s Page Speed test and Google will provide you with recommendations on how you can improve your site’s speed. Other notable tools that you can use to test your site are Pingdom Website Speed Test and GTmetrix.

11. Scan Your Site for Malware

One way to keep on top of your website’s security is to regularly test your site for any malware. If you are connected to Google Search Console, it will let you know if malware is detected on your site. If your site has been found to have any form of malware, Google Chrome will actually alert your visitors that your site is dangerous. This can have devastating effects on your traffic and conversion rate. No one will want to enter their payment information on a site that has malware. In extreme cases, Google may block your site from appearing in the Google search results page. You want to prevent this from happening. It would be best to invest on your site’s security by installing a security plugin such as Sucuri Security and WordFence. Even if you have those plugins installed, it is still a good idea to a manual scan. You can scan your website at Sucuri’s Website Malware and Security Scanner, or at SiteGuarding. If any manual scans detect anything malicious, you can contact your developer to fix the issue. You should get it fixed before Google applies any penalties. Wooassist also offers a security hardening service to improve the security of your site so you can prevent this from happening.

12. Fix Broken Links

Broken links are bad for user experience so check your site regularly for any broken links. You can use W3C Link Checker or any other similar tool to check for broken links. Once you’ve found the broken links on your site, you can start fixing them. You can either remove the links or points the links to a new relevant URL.

13. Test Your Checkout Process

Last but definitely not the least; you should regularly test your checkout process. If you suddenly experience loss of sales, it’s a good idea to test your checkout. There might be an error that prevents your customers from checking out. Testing also gives you a feel of what your customers go through so you can optimize your checkout. Once you’ve determined that your checkout has problems, you can check out our post on how to fix the most common checkout problems in WooCommerce.

Final Notes

By doing these tasks on a regular basis, you can keep yourself on top of any issues that may occur on your WooCommerce store. If you find yourself overwhelmed by the all these, you can hire someone else to do it. You can also contact us and our team will be glad to assist with any of these tasks.

Are there any other routine maintenance tasks for WordPress and WooCommerce you think should be done on a regular basis? Do you have any suggestions? Let us know in the comments.

Filed Under: How-To Articles Tagged With: blog, contact form, conversion optimization, image optimization, plugins, security, site speed optimization, website maintenance, WooCommerce, WooCommerce products, WordPress, WordPress SEO, WordPress updates

How to Save Time and Money When Outsourcing a WooCommerce Developer

June 21, 2019 By John Leave a Comment

How much is your time worth? Do you usually spend a couple of hours trying to fix an issue on your WooCommerce store? You should be spending more time working on making your business more profitable. Don’t waste your time dealing with bugs and plugin updates. Leave that to a developer that can do the task more efficiently.

If you’ve never outsourced a WooCommerce developer before, you’ll find that it’s not that difficult. We’ve outlined some things that you can do so you can save time and money when hiring a WooCommerce developer.

Why Outsource?

If you are asking yourself why you should even outsource, outsourcing will help you free up your time. More free time means you can focus on the more important aspects of your business. Also, outsourced work is cheaper. Don’t waste time going through forums and various support channels for help. Sure, you might be able to fix your problem but at what cost?  That is time spent that you’ll never get back. You can outsource a WooCommerce developer that will do complex tasks in a fraction of the time.

What Tasks Can You Outsource?

You can outsource just about any tasks you don’t want to do. Outsourcing routine maintenance tasks is always a good idea.

Site Updates and Maintenance

There are plenty of tasks that you can outsource on WooCommerce and one of the most important one is your site updates. If you do not update your WooCommerce store on a regular basis, you are not getting important security updates. This exposes your and your customers’ data to cyber criminals.

Hackers typically look for outdated sites as they are easy targets for hacking. If you do not have time to do regular updates, you can have an outsourced WooCommerce developer do it for you.

On your end, you must ensure that your developer creates a back up of your site and tests updates on a staging site. Some WooCommerce store owners might be wary of updating their site because they experienced problems due to site updates in the past. This is the reason why you should test updates on a development site first. You should not wait for your production site to break because you haven’t been updating it in months. While your site can break when you update it, you can do this in a controlled environment. This is a lot better compared to being forced to take down your site while you troubleshoot. If this happens, your site could be down for hours or even days. You can do your site updates regularly to prevent this from happening.

Fixing Bugs and Other Issues

Things will break on your site every now and then. That’s an issue all ecommerce store owners will have to deal with. Instead of worrying about it, you can outsource a WooCommerce developer fix these issues for you.

Site Speed Optimization

Some elements on your site could be dampening your site speed. An experienced WooCommerce developer can help you optimize your site so it runs the fastest that it can.

Design Tweaks

If you need a quick design tweak, what would take you an hour or two to do might just be a 15-minute job to an experienced WooCommerce developer.

Adding New Features/Custom Development

WooCommerce is customizable if you know how to code. With a trusted WooCommerce developer, you can customize your site however you want to.

How Can You Save Time and Money When Ourtsourcing a WooCommerce Developer?

save time and money outsourcing

Find a Skilled Developer

Wooassist developers have spent years working on various WooCommerce sites. They have dedicated themselves to knowing everything about WooCommerce. If you are looking for WooCommerce expert, you can contact us. You can also try your luck hiring a freelancer at websites like Upwork. Try to find someone who has a lot of experience working with WooCommerce websites.

Wear the Project Manager Hat

If you’re going to outsource a WooCommerce developer, you’ll need to manage your projects. If you don’t have staff to do that for you, you’ll have to manage your projects yourself. Or you can hire Wooassist and you’ll be assigned your own project manager.

Use a Project Management Tool

There are several project management tools that you can use. You just need to determine which one would work for you. Some project management tools we can recommend include Asana, Kanbanflow and Trello.

Define Project Goals

A project is clearer if you have realistic and achievable goals. When talking to your developer about a project, always let them know what the goal is.

Make an Effort to Write a Detailed Project/Task Brief

Don’t downplay the importance of writing a project or task brief. Spending more time writing a detailed project brief actually saves you time. If you don’t write a good task brief, you will spend more time making corrections and asking for revisions. Define the objective and include all the necessary details in your task brief.

Prepare All Necessary Files

When you send a task to your developer, always send them all the necessary files needed to accomplish the task. Use appropriate file names to avoid confusion. Also, use common file formats.  If you are using the cloud to share your files, make sure you grant the necessary access permissions. In the task brief that you prepare, it helps to include a note on what the files are for.

Prepare and Double Check Login Information

Provide all the necessary login information to the developer working on your tasks. We recommend testing the login information to ensure they are correct. For a developer, nothing wastes more time than finding out you cannot log in to a site you are working on. More time is wasted if they can’t get the correct login information right away due to time zone differences.

If you have not tried outsourcing a developer before, don’t be afraid to take the first step. You can free yourself from your WooCommerce woes if you work with a trusted developer. Let us know in the comments if you might have any questions about outsourcing.

Filed Under: How-To Articles Tagged With: outsourcing, website development, website maintenance, WooCommerce

10 Things You Can Do Right Now to Improve Your WooCommerce Store

October 10, 2017 By John Leave a Comment

Ecommerce - Improve your WooCommerce StoreAs a WooCommerce store owner, your goal is to make your business as profitable as it can be. Here, we list down 10 things that you can do today to improve your WooCommerce store.

1. Add a call-to-action button on your home page

Adding a call-to-action button on your home page encourages your visitors to take whatever action you want them to take. You can direct them to click on your shop, sign up to your email newsletter, send you an email, call you, or add a product to the cart.

thumbs-up

2. Add your contact details

Making sure that your contact details are immediately visible will increase your site’s trust rating. It can be your email or phone number. You can even add your store’s address if you have a physical store.

3. Add an email capture form

Getting your customer’s emails will allow you to send newsletters or special offers to those who sign up.

4. Remove distractions from your checkout page

Removing distractions from your checkout page will reduce cart abandonment. When a customer reaches your checkout page, you don’t want them clicking anything else except that “Pay Now” button.

5. Add related products to your product page

Adding related products to your products page will encourage your customers to purchase more items from your store. This will increase your average order value.

6. Offer free shipping

Not everyone can offer free shipping. But if you are able to, free shipping can really amp up your conversion rates. You can also offer free shipping with a minimum order value or for specific locations only. Make sure your visitors know you offer free shipping by placing a notice in a prominent area of your site.

7. Optimize your product copy

There are a lot of ways to optimize your product copy. You can optimize your copy to appeal to customers by emphasizing on the problems that your products can solve. You can also optimize your product copy to include technical details. Lastly, you can optimize your copy for ease of reading. How you optimize your product copy really depends on your product and your customer profile. You can use Hemingwayapp to check your copy’s readability score.

8. Optimize images on your WooCommerce store

product-zoom-in

When uploading product images, you must first optimize your product images to make sure you are uploading the correct image sizes. To determine the correct image sizes for your theme, you will need to use the “Inspect Element” feature of your browser. You will then need to go to WooCommerce settings to set the correct image size. Uploading anything bigger than the image placeholder’s size is a waste of resources and will just slow down your site. You can learn how to optimize images for the web in this blog post.

9. Remove sliders and use a single hero image with a call-to-action

Sure, sliders look good. But the truth is, they may actually do more harm than good to your site. Sliders can really slow down a site and a slow site is bad for SEO and conversion rate. Also, sliders can confuse customers and makes for bad user experience. Your website must send a clear message on what you want your customers to do. A slider just confuses your customers with various images that look like advertisements.

10. Make your site is mobile responsive

If you have not updated your site’s design for years, it might not be mobile responsive. This means that your website does not adapt to different screen sizes which makes browsing on a mobile device difficult. This is not good for your site’s user experience. Also, having a mobile responsive WooCommerce store is an advantage in terms of SEO. You can address this by using a responsive theme such as Storefront or the Genesis framework with a Genesis child theme. Both these themes are compatible with WooCommerce.

If you need any help getting any of these things done, you can contact us and we will help you get these sorted. If you have any questions, you can let us know in the comments section.

Filed Under: How-To Articles Tagged With: admin, best practices, call-to-action, content marketing, conversion optimization, design tweaks, e-commerce, how-to, optimizations, page speed, responsive design, website maintenance

Why You Should Use a Development Site for WooCommerce

August 14, 2017 By John Leave a Comment

Using a development site (or a staging site) is best practice when working with websites. A development site allows web developers to safely test new features and updates without affecting the live site.

In the absence of a development site, developers will need to test new features and updates on a live site. This is not recommended because such actions can cause critical errors that may break the functionality of the site. In some cases, adding new features and new updates can cause a  website to go down. Without a proper backup, the results could be devastating especially for e-commerce stores.

Testing Ground When Adding New Site Features

If you want to add some new functionality on a live WooCommerce store, it is best to test this first on a development site. Make sure that everything is working before you roll out the new functionality to your customers.

You will most likely have a web developer who will help you add the new functionality that you want. If this is the case, the developer will recommend doing the changes first on a development site. On the off-chance he doesn’t, talk it over with your developer and recommend testing the new functionality on a development site. After adding the new feature, do some user testing on the development site to ensure that everything is working as intended and that no other existing features have been affected.

A Development Site Prevents Errors on Live Site During Site Updates

Aside from when adding new functionality to your WooCommerce store, you should use a development site when updating your site. Doing site updates on your live site can break your site so it is always best to test your updates on a development site. This is especially true when you are dealing with major releases of WordPress and WooCommerce.

How to Create a Development Site

But how do you create a development site on your server? Some hosting providers such as WPEngine provide a staging environment for their customers. If you do not have a development site, you can create one manually. However, do note that creating a development site is a complex process that includes tinkering with your site files and the database. If you are not confident in working with your site files and the database, scroll down to the next section. If you are confident with editing your site files and database, just follow the steps below:

1. Log in to cPanel.

2. Go to your File Manager and go to the public_html folder. Create a ‘dev’ folder there.

How to Create a Development Site - step2

a. Copy your WordPress files from your current directory to the ‘dev’ folder you just created. Select all WordPress files and folders.

How to Create a Development Site - step2.a

b. Click Copy on the top menu.

How to Create a Development Site - step2.b

c. Type in the directory where you want to copy the files into. In this case, the directory is /public_html/dev

How to Create a Development Site - step2.c

3. Create a database. Note: Icons may differ but the names of the items should be the same.

a. Go back to the cPanel home, Click the MySQL Database Wizard under the Databases heading.

How-to-Create-a-Development-Site---step3.a

b. Next to New Database enter a name for your database and click Next Step.

How to Create a Development Site - step3.b

c. Next to Username enter a username. Enter and confirm a password and then click on Create User. Note these down as you will need it later.

How-to-Create-a-Development-Site---step3.c

d. On the next page, you will need to assign privileges for the user on the database. Check the box next to All Privileges and then click Next Step.

How-to-Create-a-Development-Site---step3.d

4. Export your current database.

a. On the cPanel Home, click on phpMyAdmin icon under the Databases heading.

b. Select the database to export. Click on the database name you are working with in the left menu.

How-to-Create-a-Development-Site---step4.b

c. Click on Export option found in the tabs across the top of the screen.

How-to-Create-a-Development-Site---step4.c

d. Click on the radial button for Quick.

How-to-Create-a-Development-Site---step4.d

e. Next, you will need to click on the format of the export file. By default, it should be on SQL, so you don’t need to change anything.

How-to-Create-a-Development-Site---step4.e

f. Click on the Go button to start the export.

How-to-Create-a-Development-Site---step4.f

g. You will be prompted to either open or save the file. Choose the option to save the file and then save it somewhere you’ll remember.

5. Import your Database to the new database you created.

a. Still on the phpMyAdmin screen, on the left side, you should see the name of the new database you created earlier for the dev site.

b. Click on the database you created and click Import in the top menu.

c. Under File to Import, click Browse and select the backup file you previously created. You need to locate where you saved it on your computer.

d. Click Go at the bottom right. Wait for the import to finish.

e. When the database has been imported successfully, you should see a message that the import has successfully finished.

6. Configure the wp-config.php file for the dev site.

a. Click on File Manager located in the Files section of cPanel.

b. Navigate to the folder to where you uploaded WordPress.

c. Click the wp-config.php file, then click the Edit link on the top menu.

How-to-Create-a-Development-Site---step6.c

d. On the edit screen, change the values in the image below to the values you set for the new database you created earlier.

How to Create a Development Site - step6.d

7. Change the site URL for the dev site.

a. The site URL is stored in the WordPress database. In order for the site to load as a dev site, the site URL will need to be changed to the subfolder URL, eg. example.com/dev

b. Go to phpMyAdmin. Select your WordPress database. Then select your wp_options table.

How to Create a Development Site - step7.b

c. Your wp_ prefix may differ depending on your install settings.

d. Click Edit beside either the siteurl or home entries.

How-to-Create-a-Development-Site---step7.d

e. Enter in your new value in the option_value field, then click Go.

How to Create a Development Site - step7.e

8. Ensure that image links in your pages and posts are also changed.

a. These are in the database and not connected to the site URL so they will need to be changed separately.

b. Using the sidebar again, find and click on the wp-posts table.

How-to-Create-a-Development-Site---step8.b

c. Look to the top of the screen and you will see several tabs that run across the page. Click on the SQL tab.

How-to-Create-a-Development-Site---step8.b2

d. You are now on a MySQL editor screen. In the code area, copy the following bit of MySQL.

How-to-Create-a-Development-Site---step8.d

UPDATE wp_posts  SET post_content=(REPLACE (post_content, 'old url','new url'));

e. Be sure to replace <old_url> with the old sitename and <new_url> with the new site name. For instance, our original site was domain.com and the new test site will be at domain.com/dev so the code should appear as below:

UPDATE wp_posts SET post_content=(REPLACE (post_content,  ‘domain.com ',’ domain.com/dev '));

f. Click on the Go button to run the code and change the URLs for all images in the posts. This will also affect any other ‘hard coded’ links that were in the posts that pointed to the original site.

9. Update permalinks.

a. You can now login to your development site’s admin panel and update permalinks with the current settings. Just click update button. 

10. Hide dev site from search engines. 

a. Go to Settings > Reading page on backend, and make sure that the dev site is set to hide for search engines

b. If you are using WordPress SEO plugin by Yoast, you should turn off the sitemap functionality as well.

Create a Development Site Using a Plugin

If the steps in the previous section were too much to swallow, there are several plugins that you can use to create a development site. You can use Duplicator or WP-Staging plugin. Just follow the instructions on the plugin page and you should be good to go.

We hope this article can help you create your own development site. If you need help setting up a development site, the Wooassist team can help out. Just drop us an email. Or if you have questions, you can leave a comment below.

Filed Under: How-To Articles Tagged With: best practices, how-to, outsourcing, website development, website maintenance, Wooassist, WordPress

  • « Previous Page
  • 1
  • 2
  • 3
  • 4
  • Next Page »
Let us support your online store so you can manage your business

Get started today

Get 2 Hours of FREE SUPPORT

We are so confident that you will love our services that we will give you your first 4 hours at a 50% discount

That’s 4 hours for only $75

BUY NOW

Free eBook

5 Things Every Online Store Can Fix On Their Website In The Next Week To Increase Sales

Quick Links

  • How it Works
  • Pricing
  • Blog
  • Contact
  • About Wooassist
  • My Account
  • Checkout
  • Privacy Policy
  • Cookie Policy
  • Terms and Conditions

Wooassist

Australia:
59 Luke St.
Hemmant QLD 4174

Philippines:
San Miguel St.
Poblacion, Iligan City 9200

Connect


Copyright © 2026 · Wooassist

Yours FREE!

5 Things Every Online Store Can Fix On Their Website In The Next Week To Increase Sales