Wooassist

Assistance for Your Woocommerce Store

  • How it Works
  • Pricing
  • Services
    • Site Maintenance
    • AI SEO and Content Marketing
  • Blog
    • How-To Articles
    • Code Snippets
    • SEO For E-Commerce
    • Theme and Plugin Reviews
    • Wooassist News
    • WordPress/WooCommerce News
    • Interviews
  • About Us
  • Contact
You are here: Home / Archives for optimizations

How to Set Up WordPress SEO by Yoast for WooCommerce

March 26, 2015 By John Leave a Comment

How to Set Up WordPress SEO by Yoast

The WordPress SEO plugin by Yoast with over 16 million downloads is easily one of the best plugins that you need to have on your website. Whether it’s a personal blog, an e-commerce store, or a company website, you should have this plugin. In fact, many WordPress developers have WordPress SEO by Yoast in their list of plugins to install each time they create a new website. Many of you may already know a bit (or a lot) about SEO and that’s okay. That just means you’ll make better use of this plugin. And for those that don’t know much about SEO, don’t worry. The plugin is user friendly. I’ll walk you through all the functionalities so you’ll know how to set up WordPress SEO by Yoast for WooCommerce.

Installing WordPress SEO by Yoast for WooCommerce

To install the plugin, head over to the plugin developer’s website. Once there, download the plugin and upload it at the plugin page of your WordPress Dashboard.

You can search for the plugin on the plugin repository by going to your WordPress Dashboard. Click on “Plugins” and then “Add New”. From there just use the search bar to search for the WordPress SEO plugin and click on “Install Now”.

SEO Plugin Especially for WooCommerce

For WooCommercestore owners, getting the premium Yoast WooCommerce SEO plugin is a worthwhile buy. When used with the WordPress SEO plugin, you can better optimize your WooCommerce store. It enhances the existing Open Graph and Twitter Card enhancements in the WordPress SEO plugin. It will also optimize your sitemap for an ecommerce store setup, among other things. For a guide on how to set this up, check out this post.

Optimizing Product Pages for SEO for WooCommerce

The single most important function of the WordPress SEO plugin by Yoast is its ability to help you optimize your blog posts and pages for SEO. That includes WooCommerce products. WooCommerce products work just like posts/pages so it is the same procedure. So when I say page or post, the same applies to WooCommerce products.

Optimizing posts/pages is easy enough. You can do it right after you finish creating the post/page in WordPress. When you’re on the post or page, just scroll down and there will be a section named “WordPress SEO by Yoast”. On the General tab, you’ll see a Snippet Preview. This is how your post/page will show up on the Google search results page. And the fun part is that you can edit how your post will show up. First off, you set a focus keyword. This should be the keyword that you want your blog post or page to rank for. What you should be aiming for is to have this focus keyword in:

  • the title of your article
  • in the body of the content especially in the first paragraph
  • and the meta description which you can set in the field where it says meta description

If you got that all right, you should be seeing all green below the focus keyword that you set.
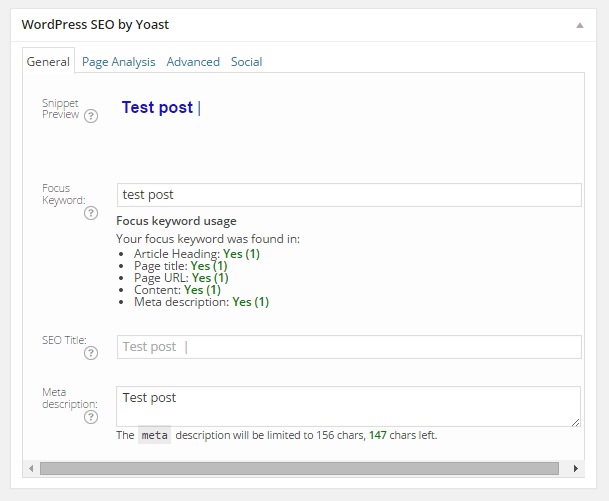
post-optimization

You can also click on the Page Analysis tab to get more information and other suggestions to improve your post/page. You don’t have to follow all the suggestions. But following everything will help increase the quality of your post/page.
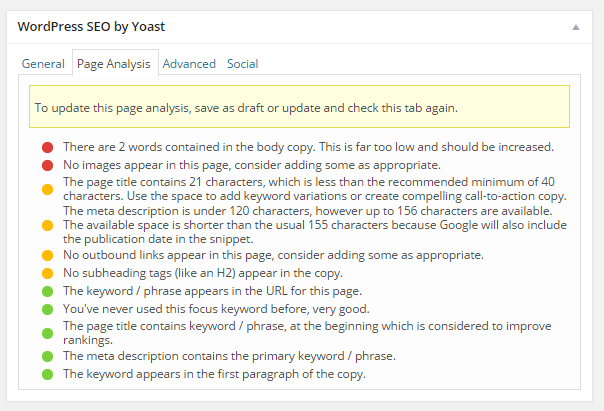
page-analysis

You can tweak a bunch of other settings under the Advanced tab so feel free to change them as you see fit. You can even change how your post would appear when it gets shared on social media under the Social tab.

Optimizing WooCommerce Product Categories for SEO
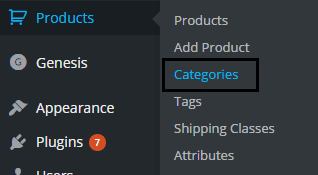
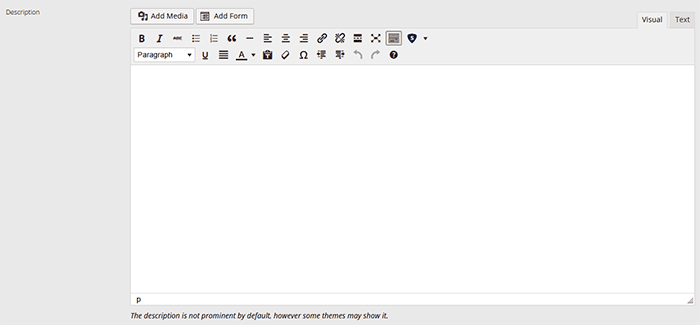
woocommerce-product-categoriesSimilarly, you can also optimize WooCommerce product categories for SEO. Just go to “Products” and click on “Categories” Edit the category that you want to optimize. When you scroll down to the bottom of the “Edit Category” page, you’ll see a section called Yoast SEO Settings. Fill in the SEO Title and SEO Description fields and click on Update.

optimizing-product-categories

Unlike when optimizing product pages, you don’t get to set a focus keyword. However, you can still target a keyword by including the keyword in the SEO Title and SEO Description fields. You should also put it in the Category Description field above the Yoast SEO Settings section.

Note that not all themes are able to display product category description on the category page but if your theme supports this function, the text that you put will appear on your product category page.
product-description

Verifying Your Website with Search Console

Verifying your website with different Google Search Console tools is important if you want your site crawled. It will have your website crawled by spiders. I don’t mean actual spiders. I mean search engine spiders that index websites on different search engines. Verifying with different webmaster tools can be a complex process but this is made easy with the WordPress SEO plugin.

Linking with Social Media Profiles

You can connect your website with your social media pages with the WordPress SEO plugin. You can do this by going to “SEO” and then clicking on “Social”. Here there are three tabs: Facebook, Twitter and Google+.

How to Connect Facebook

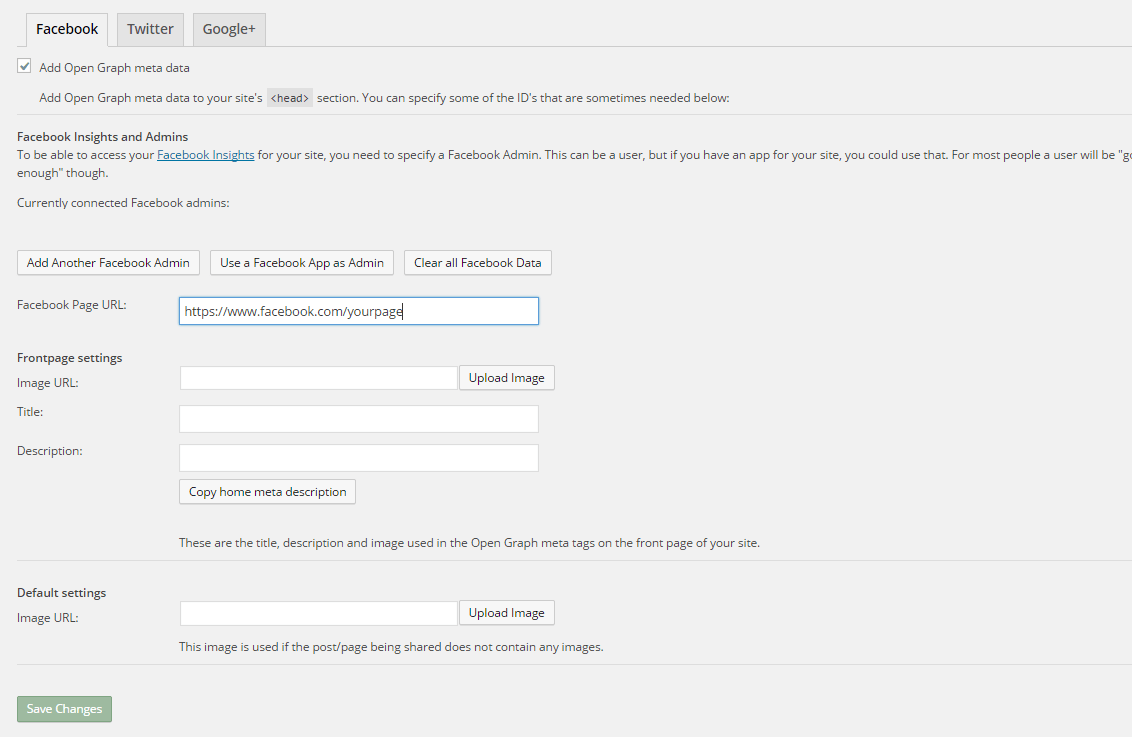
Linking Facebook to your site allows you access to Facebook Insights. If you already have a Facebook page, you just need to get the URL of your Facebook page. Copy the URL and then paste it where it says “Facebook Page URL”. You can then set the administrators for your page by clicking on Add Facebook Admin. If you are an advanced user, you can tweak a bunch of other settings. When you’re done, just click on “Save Changes”.
facebook

How to Set Up Twitter Cards

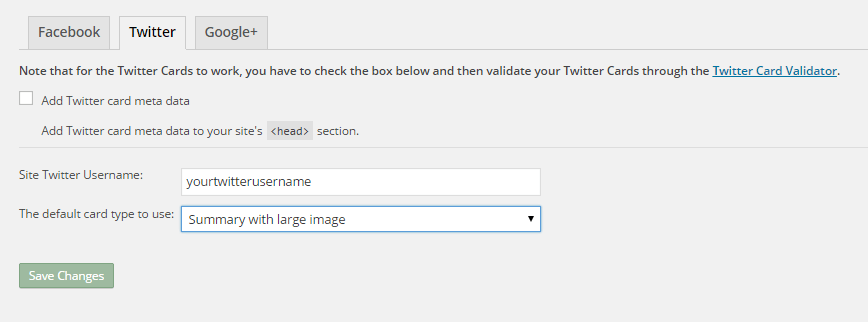
Do you use Twitter? Have you ever seen links in Twitter that show a snippet of the page that it links to? That’s called a Twitter card and you can enable that on your website using WordPress SEO. The usual thing is that enabling Twitter cards would call for you to add some lines of code to your header. But WordPress SEO eliminates the need for that.
twitter

How do you do this? On the Social section of the plugin, click on Twitter. Fill in your Twitter username on the appropriate field. Specify the kind of Twitter card that you want to have then click on “Save Changes”. You’re not done yet. You still need to confirm your Twitter card. Head over to this link. Specify the URL and click on “Preview Card”. After that, click on “Request Approval” and fill out the form. Finally, click on another “Request Approval”.

Soon, you’ll be able to see Twitter cards on your Twitter links.

The premium YoastWooCommerce SEO plugin will further help you optimize your Twitter Cards if you have that.

How to Connect Google+

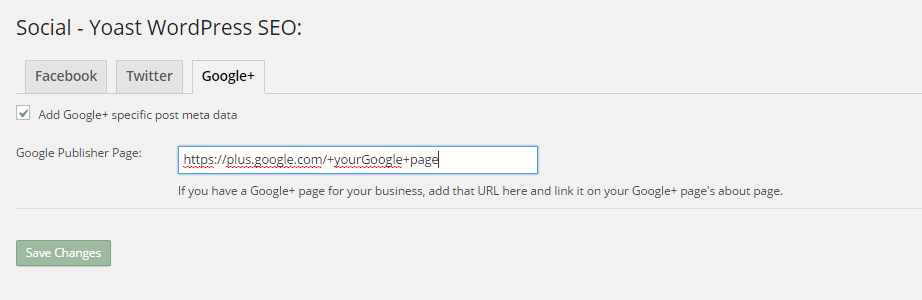
To connect your website with Google+ means setting your Google+ profile as the publisher of your content with the “rel=publisher” markup. “Rel=publisher” is an authorship markup which connects websites to Google+ pages (not personal profiles).

To connect your Google+ company page, head over to the “Social” section of the plugin and click on Google+. Fill out the field with the URL of your company page on Google+ and click on “Save Changes”.
google+

You might have heard of “rel=author” which links the content to the Google+ profile of the author. When implemented in the proper way, “rel=author” should show a snippet of the content with a photo of the author in the SERPs page. If you’re a writer and you’re hyped by that, I’d hate to burst your bubble but “rel=author” is no longer supported by Google. You can read more about it here.

Improving Sharing on Pinterest

Pinterest is another social media platform that’s worth mentioning. It has great potential for e-commerce stores. Why? Because Pinterest is image-based. The YoastWooCommerce SEO plugin makes sharing on Pinterest more worthwhile. After setting Twitter products and Schema Open Graph additions, your pins on Pinterest will start to show in a different way. In most cases, WooCommerce product will show up like posts. But with the plugin configured, your products will show up as “products”. They will show product related information such as price and variations.

Implementing Sitemaps with WordPress SEO

In a nutshell, sitemaps communicate with search engines to let the latter know when there are changes to the website. There are a lot of plugins that lets you create a sitemap. If you are already using the WordPress SEO plugin, just use the built-in sitemap module. Looking for another plugin just add an extra load to your server.
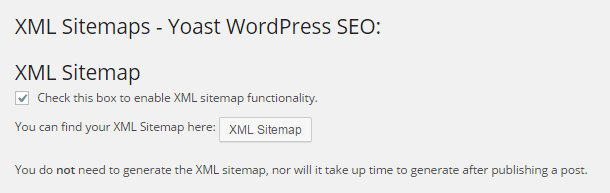
sitemaps

To get your sitemap, go to the plugin’s “XML Sitemaps” tab and then tick on the first box to enable sitemaps and click on “Save Changes”. There are a bunch of settings that you can tweak. You can have a look at them and change them as you please. They are pretty much self-explanatory.

You also might want to get the WooCommerce SEO plugin, which was mentioned above a couple of times. This removes some unnecessary bits from your sitemap in automatic fashion.

Check out our post on how to create a sitemap for your WooCommerce store to learn about sitemaps and other means of creating it.

Permalink Settings

Permalink settings all have to do with your URLs. I would not recommend changing any of the settings here but you are free to check them out and change them as you please.

Enabling Breadcrumbs with WordPress SEO

Breadcrumbs, when enabled, helps users identify where they are on your website. It also helps search engines determine your website’s structure. See the image below.  Where the yellow arrow is pointing at, that’s the breadcrumbs.

Enabling breadcrumbs on your website is simpler than snapping your fingers. Just go to SEO and then click on Internal Links. You should see a box that says “Enable Breadcrumbs”. So just tick that box and save. There are a few settings that you can tweak so just change them up as you need.
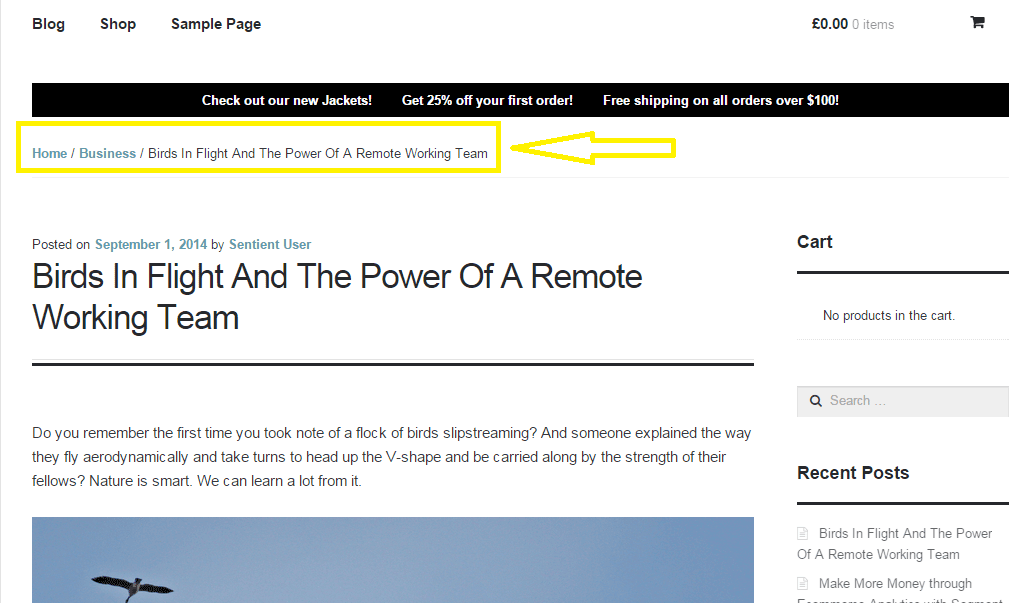
breadcrumbs

Did we miss anything? Or do you have any questions about the WordPress SEO plugin? Let us know in the comments.
Filed Under: How-To Articles, SEO For E-Commerce Tagged With: blog, breadcrumbs, content marketing, Google Webmaster Tools, Google+, how-to, navigation, optimizations, plugins, SEO tools, social media, Twitter, WooCommerce, WordPress, WordPress SEO, XML sitemap, Yoast

How to Create a Child Theme for Storefront

February 26, 2016 By John 2 Comments

how-to-create-a-child-theme-for-storefront

Optimizing your website usually means making changes to your theme. These changes can range from simple to complex. It’s easy to make changes on your website but the problem is that you will lose all your changes when you update your theme.

There are ways to update your theme without losing your customizations and the best way is to use a child theme. In this post, we will teach you how you can use a child theme to make the website development process easier.

We’ll teach you how to create a child theme for Storefront theme. Storefront is the official theme for WooCommerce. It’s a good parent theme to work on as it’s built with the same high standards as WooCommerce. It is entirely free and 100% compatible with WooCommerce.

What is a Child Theme

A child theme is not a full theme. It only inherits all the code, styling and functionality of the main or parent theme. Changes made in a child theme do not affect the parent theme. This allows users to tweak a theme without having to worry about losing the customizations when updating the theme. Using a child theme is best practice for altering an existing theme.

A parent theme is the default of all your WordPress themes. It contains the templates, design and functionality needed to run your website on WordPress. Note that parent themes are different from theme frameworks. A parent theme is a complete theme that you can use right away while a theme framework like Genesis is a developmental template.

Why You Should Use a Child Theme

There are thousands of themes out there that you can use for your WordPress installation. The problem is they all look generic and may not exactly fit your website needs. Modifying the theme with CSS is recommended. Here are some reasons why you should use a child theme:

Speed Up Site Development

Child themes allow you to quickly add or modify specific functions or template files. It allows you to significantly speed up site development as you would not need to write a lot of code from scratch. You’ll get a great deal of flexibility especially from powerful theme frameworks like Genesis.

Preserve Theme Changes

Themes get updates from time to time. These updates are important as these address security exploits that come to light. Updating your theme will wipe all the changes you made to the base theme. However, if you use a child theme, you can preserve any changes you make to the child theme when you update the base theme.

Safe Fallback

Creating or editing a theme entails a lot of work. However, when you make customizations on a child theme, you have your parent theme’s codes and functionality as fallback in case you mess up something. The child theme will only change a specific function or style when you want it to.

Secure Your Site

WPBeginner found out that 83% of hacked WordPress sites are not upgraded properly. The safest way to update your theme is by using a child theme.

When to Use Child Themes

If you are in any way customizing your theme, then you should be using a child theme. Using a child theme is best practice.

If you are not familiar with CSS and PHP, creating your own child theme can be a challenge. You would also need to learn about the functionalities of your parent theme.

Robust frameworks can be more challenging as they have their own filters and hooks.

How to Create a Child Theme

Setting up a child theme for any WordPress theme is easy but you need to pick a good parent theme. Not all themes can be good parent themes. We recommend Storefront or the Genesis framework.

A good parent theme is a solid foundation for your site. You will be building your child theme over it so it has to be flexible and coded properly.

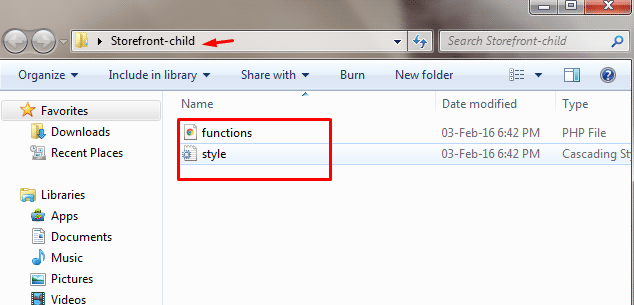
You can use plugins to generate a child theme or you can do it manually. You just need three things to start: child theme directory, style.css file and functions.php file.

Child Theme Folder

This folder will serve as the container for your stylesheet and function files. It is ideal to use the name of your parent theme as folder name and append it with “-child”. In this case, we named our directory “Storefront-child”. Make sure that your child theme’s directory name has no spaces to avoid possible errors. For the meantime, you can create this folder in your computer.

child-theme-folder

Child Theme Stylesheet

This is a basic style.css file. You need to set this stylesheet to inherit the styles from your parent theme. To do that, insert the stylesheet header below and replace them with relevant details. Note that customizations done here will override parent theme styles.

/*
 Theme Name:   Storefront Child
 Theme URI:    http://sitename.com/storefront/
 Description:  Storefront Child Theme
 Author:       Nick J
 Author URI:   http://sitename.com
 Template:     storefront /*this is case sensitive*/
 Version:      1.0.0
 License:      GNU General Public License v2 or later
 License URI:  http://www.gnu.org/licenses/gpl-2.0.html
 Tags:         light, dark, full-width, responsive-layout, accessibility-ready
 Text Domain:  storefront-child
*/
/*Theme customisations start here*/

We won’t teach you how to use CSS. It is impossible to cover that in one article. You can learn CSS here or have a developer do the CSS tweaks on your website.

Child Theme Function

Previous methods suggest that you use “@import” in your stylesheet to load your child theme. This is no longer considered best practice. You just need to “enqueue” your parent theme’s stylesheet in your child theme’s functions.php file. To do this, you can use “wp_enqueue_scripts action” and use “wp_enqueue_style()”.

The stylesheet for your child theme is usually loaded automatically. If not, you will need to enqueue it as well. You also need to make sure that the child stylesheet gets priority. You can use the code below instead. This code sets ‘parent-style’ as a dependency so your child-theme stylesheet loads after it.

<?php
function theme_enqueue_styles() {
$parent_style = 'parent-style';
wp_enqueue_style( $parent_style, get_template_directory_uri() . '/style.css' ); wp_enqueue_style( 'child-style', get_stylesheet_directory_uri() . '/style.css', array( $parent_style ) ); } add_action( 'wp_enqueue_scripts', 'theme_enqueue_styles' );
?>

Activation

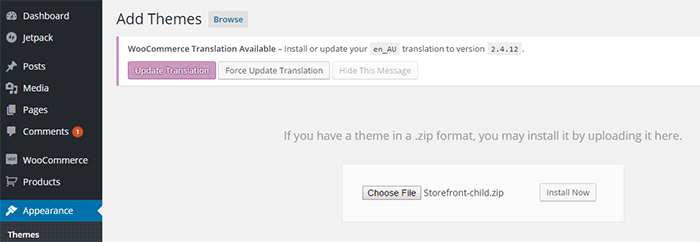
To add a child theme to your WordPress themes, you need to create a .zip file of your child theme folder. You can use 7-zip or Winrar to do this. Make sure that you have your style.css and functions.php inside your child theme folder.

It is best to take note and keep records of other plugin settings before you activate your child theme. Once you’re done, you can upload this in your WordPress via Appearance > Add Themes.

child-theme-activation-storefront

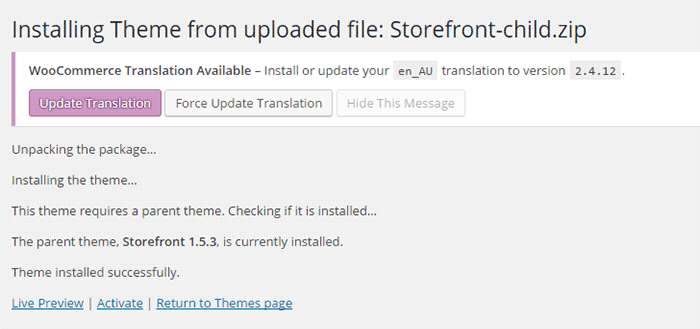
WordPress will install your child theme just like any other theme. Once installed, you need to activate this by clicking on ‘Activate’.

child-theme-activation-storefront-2

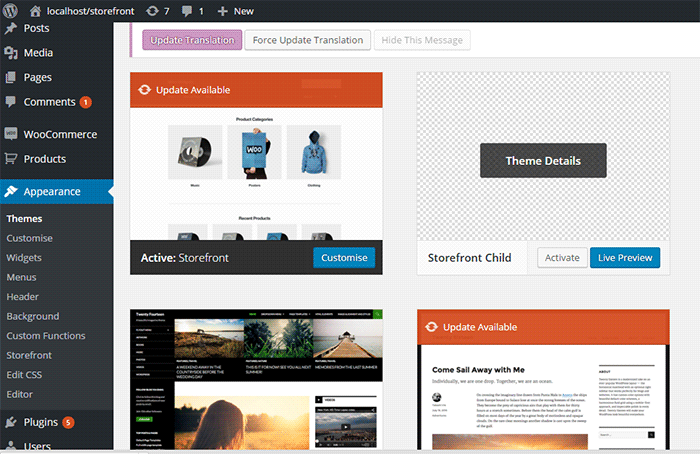
You can also choose to activate your child theme later when you go to Appearance > Themes.

child-theme-activation-storefront-appearance-themes

Once installed or activated, you can apply any edits to functions.php and to the stylesheet directly on the child theme files

Popular Child Themes for Storefront

If creating your own child theme is proving to be a bit too difficult for you, you can always purchase one.

There are a handful of child themes for Storefront right now. Note that you should install Storefront base theme first before installing these child themes.

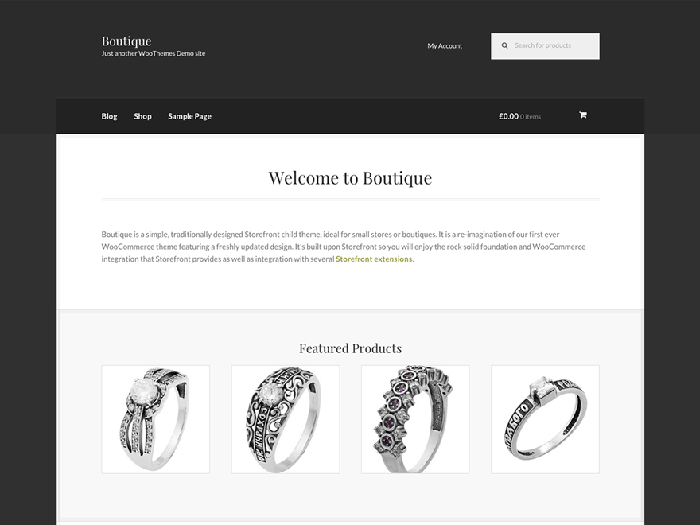
Boutique

boutique_popular-child-themes-for-storefront

Boutique is simple and easy to customize. You can start selling after you create your color theme, add your logo and content.

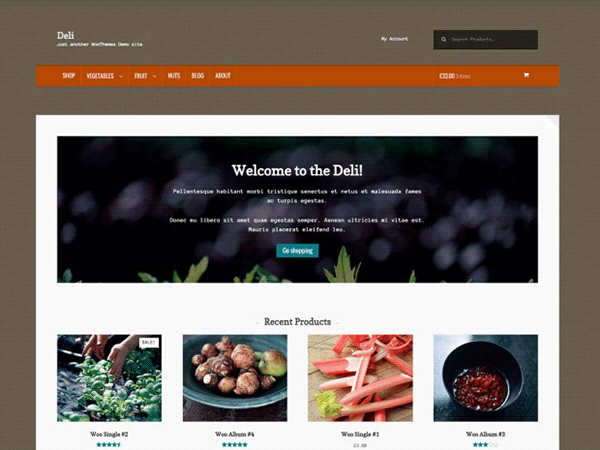
Deli

deli_popular-child-themes-for-storefront

If you want to add more personality to your store, you can use Deli. This child theme is great for small businesses. It has color schemes and textures that are inspired by nature.

Conclusion

Having a child theme is best practice when doing development work on your WooCommerce site. More importantly, using a child theme allows you to freely update your theme without losing any customizations you made on the child theme. A good and solid foundation is important for child themes. Hope this article has been helpful. Do you have any questions about child themes or anything you’d like to add? Let us know in the comments.

Filed Under: Code Snippets, How-To Articles Tagged With: best practices, child theme, code snippet, CSS, design tweaks, how-to, optimizations, Storefront, website development, website maintenance, WooCommerce, WordPress

How to Recover Abandoned Carts in WooCommerce?

November 30, 2019 By John Leave a Comment

How to Recover Abandoned Carts in WooCommerce

It’s not uncommon for ecommerce shoppers to abandon carts. You may not know it, but your store might also be suffering from carts being abandoned. This problem can be addressed however. To start, you must determine why your customers abandon their carts.

Why online shoppers abandon carts and what you can do about it?

There are various reasons why online shoppers abandon their carts. We lay out the most common ones and what you can do to address them.

Checkout is Too Complicated

Your customers will nitpick and that is to be expected. When you make your customers jump hoops during checkout, you’re not doing them a favor. Your checkout should be quick and straightforward. If you must add some other stuff that will complicate checkout, consider if you can add it on the thank you page instead. The thank you page is the page where the customer is redirected to after making a successful purchase. If you need help tweaking your thank you page, the Wooassist team can help.

Users Need to Create an Account to Check Out

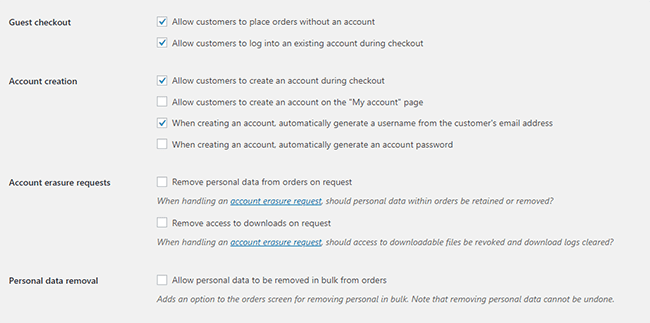
Internet users are already burned out having to create an account for each internet service that they use. Don’t add to that burden. Don’t force your customers to create an account if it’s not necessary. To enable guest checkouts on WooCommerce, go to your WordPress Dashboard, click on WooCommerce > Settings. Under the Account and Privacy tab, enable “Allow customers to place orders without an account”. You can tweak other account related settings here to your liking.

Too Many Checkout Form Fields

The default WooCommerce checkout page is good enough as it is. There is no need to add more fields unless necessary. If you’ve edited your checkout page before to add some unnecessary fields, look into it and consider removing it.

Unexpected Charges

Customers will abandon your checkout when they see the shipping fee. No one will force you to offer free shipping if it will make your business unsustainable. There are however some things that you can do to reduce abandoned carts as a result of shipping and other fees. People now are more accepting of shipping fees. For other fees, be transparent from the get-go. If you charge taxes, handling fees, and other fees, make it clear starting from the product page that you charge these fees. If they are suddenly greeted by these fees on checkout, it will look like unscrupulous practice.

Too Many Clicks to Checkout

Reducing cart abandonment is all about simplifying your product purchase process. Ideally, it should not take more than three clicks for a customer to check out. If it takes four clicks to check out, that is one click too many. Get rid of unnecessary barriers to completing checkout.

Don’t Make it Hard to Contact You

Some of your prospective customers will look for your contact details before they make a purchase. If they added a product to their cart but could not find your contact information or even a contact us page, there is a high likelihood that that user will abandon that cart. To prevent this from happening, make sure you have a contact us page. Even better, if you can add your email or phone number on your WooCommerce store’s header.

Payment Issues

Another common reason for abandoning shopping carts is payment issue. When the customer tries to pay for his/her order and it fails, you can bet that cart will be abandoned. The solution here is simple. Offer more than one mode of payment. Some common payment channels you can use are Paypal, Stripe, Authorize.net, Apple Pay, Amazon Pay, and Square.

Other Things You Can Do to Reduce Cart Abandonment

Show Security Certificates

To be able to sell your products or services online, you’ll need to be able to establish that you are trustworthy. You can show security certificates and security seals on your checkout page to improve your trust rating. Some security seals that you can add to your site as Norton, McAfee and TRUSTe.

Offer Free Shipping

Free shipping can significantly reduce your cart abandonment rates. However, not every business can make a profit when offering free shipping. As an alternative, you can offer free shipping when your customers meets a required minimum order value or quantity. This strategy can also help improve your average order value.

Offer a Money-Back Guarantee

Most consumer laws dictate that you should have a return policy anyway. So there’s no reason not to do it. Making your money-back guarantee known shows your prospective customers that you have faith in the quality of your product or service. Don’t worry about the people that might abuse your money-back guarantee. It hardly ever happens. And if it happens a lot, the problem might be your product.

Improve Your Page Load Speeds

If your site is slow, some of your prospective customers might get frustrated and abandon their carts. Make sure your site is fast.

How to Recover Abandoned Carts

There are many ways to recover abandoned carts. Some of the more common methods are remarketing and abandoned cart emails.

Using Remarketing to Recover Abandoned Carts

There are many platforms that you can use for remarketing. Essentially, remarketing works by saving a cookie on the user’s browser so you can show them your tailored ads. Neil Patel details how you can use remarking on Adwords to recover abandoned carts. Facebook is another platform that you can use for remarketing. SproutSocial details how to use remarketing on Facebook.

Using Abandoned Cart Emails to Recover Abandoned Carts

Abandoned cart emails send your customers a reminder email if they did not complete their purchase. For guest checkouts, this requires that the user must at least have entered his/her email address. This won’t be an issue if you require your customers to register before making a purchase. Do note however that requiring customers to create an account may hurt your conversion rates. There are a lot of abandoned cart email plugins that work for WooCommerce, you just have to find the plugin that works for your needs.

Recover abandoned carts and improve your sales by implementing these strategies. If you have any questions, you can post a comment below. If you need help setting up abandoned cart emails or anything else, you can send us email.

Filed Under: How-To Articles Tagged With: abandoned carts, checkout, checkout form, conversion optimization, email marketing, optimizations, remarketing, security, trust rating, WooCommerce, woocommerce checkout

How to Optimize WooCommerce Products for SEO

May 31, 2018 By John 1 Comment

You’ve set up your WooCommerce store but you’re not getting any traffic. You wonder what you’re doing wrong. Have you optimized your product pages for SEO? If not, that could be one of the reasons why you’re not getting any traffic. In this article, we’ll teach you how to optimize your WooCommerce products for SEO.

Why Optimize for SEO?

You can do all the link-building you want but if the pages that you want to rank for are not properly optimized for SEO, then you’ll have a hard getting ranked on top of Google.

Still, traffic is just a metric and what really matters is your conversion rate. Even if you are getting thousands in traffic but they are not converting, you still have a problem. On the other hand, you can’t convert anyone if you are not getting any traffic at all. Essentially, SEO and conversion optimization go hand-in-hand.

You have to optimize for SEO to make sure you are attracting the right people to your WooCommerce store.

Steps on How to Optimize WooCommerce Products for SEO

Identify What Keywords to Optimize For

Normally, it will be difficult to rank for regular keywords. For example, if you are selling digital cameras, it will be difficult to compete with Wikipedia or Amazon unless your WooCommerce store is already an authority on digital cameras. So optimizing for the keyword “digital cameras” won’t work for you. This is where long-tail keywords come in.

What is a Long-Tail keyword?

Compared to a regular keyword, long tail keywords are longer and more specific. Instead of optimizing for “digital camera”, you can optimize for specific camera models or for specific features of digital cameras. Optimize for anything unique about the product that you are selling. A few examples of long-tail keywords can be “digital camera for underwater photography”, “digital cameras for beginners”, or “sports action digital camera”.

Do Your Keyword Research

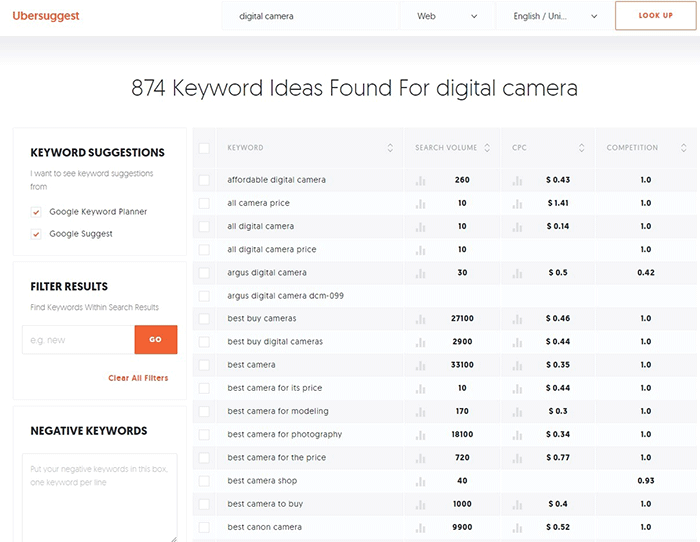
Don’t start optimizing until you do your keyword research. You can use whatever keyword research tool you have at your disposal. We can also recommend Ubersuggest. Just pop in a basic keyword and you can get a list of long-tail keywords that you can optimize for along with some valuable search data. You can even filter the keyword ideas and remove negative keywords. You can also export the keywords into a handy CSV file.

Ubersuggest Keyword Research

Add the Long-Tail Keyword to Your Product Page

To help with optimizing your WooCommerce Products for SEO, you can use the WordPress SEO plugin by Yoast. The plugin provides detailed information on how you can optimize your products for SEO. It also has a boatload of other features that will help boost your SEO. Just install the plugin and you’ll gain access to the SEO optimizations block on your WooCommerce product editor.

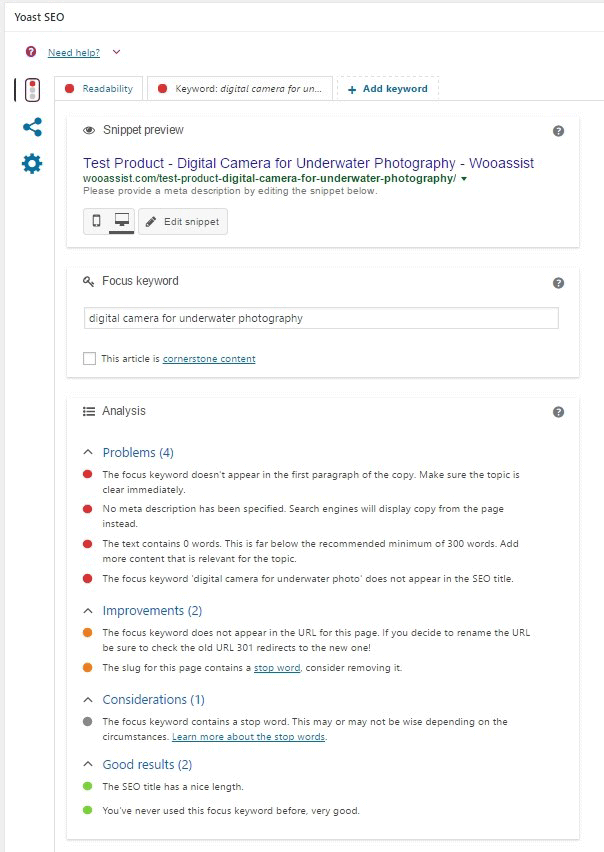
When optimizing products for SEO, input the long-tail keyword that you wish to target on the “Focus Keyword” field. After doing this, you can see the analysis section below will show you recommendations on how you can improve your product’s SEO score.

How to Optimize WooCommerce Products for SEO

Generally, you will need to add your focus keywords to:

  1. The article title
  2. The first paragraph of the article
  3. One of the heading tags
  4. On the body of the article
  5. In one of the image alt tags
  6. In the URL/slug

You don’t need to force yourself to do every little thing that the Yoast SEO section recommends. Just use it a rough guide since it does recommend the currently known best practices.

Improving Content Readability

Google now also considers content readability as an SEO ranking factor. So it is important to ensure that your product descriptions are easy to read. In some cases, you may have to use some technical terms when writing your product descriptions and that’s totally fine. Depending on your products, that may actually be best practice. Still, it’s a good idea to check the readability of your content.

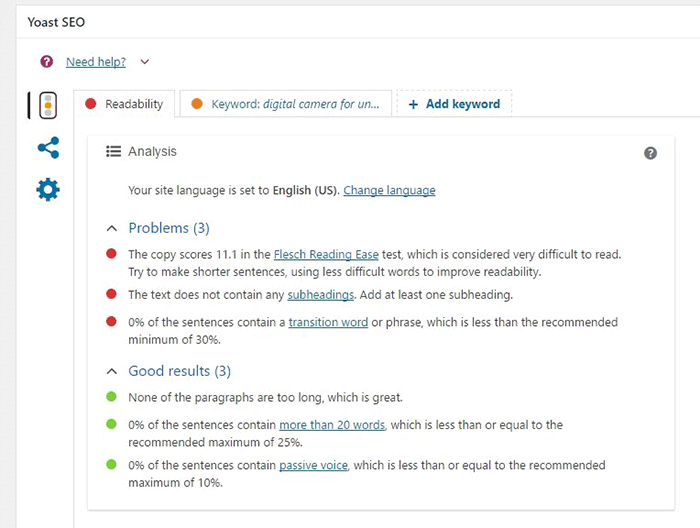
The Yoast SEO section also gives recommendations on Readability. Just click on the readability tab and you’ll see the problems that need to be addressed.

WooCommerce Products Optimize for Readability

When creating your product descriptions, you can also use Hemingwayapp to optimize its readability. You can also use this tool when writing blog posts.

Now that you know how to optimize your content for SEO, people who are interested in your products are now more likely to find your products. If you need help with SEO optimizations, the Wooassist Team can help. We’ll start off by doing an SEO audit of your site so we can determine what needs to be addressed and move forward from there.

Optimizing your WooCommerce store does not end with product optimizations. There are other optimizations that need to be done to ensure you are maximizing your conversion rates.

Filed Under: How-To Articles, SEO For E-Commerce Tagged With: keyword research, optimizations, seo, SEO strategy, SEO tools, WooCommerce, WooCommerce products, woocommerce seo, WordPress SEO, Yoast

11 Things You Can Do to Increase the Security of Your WooCommerce Store

March 11, 2018 By John Leave a Comment

Increase the security of your WooCommerce store

Keeping your WooCommerce store secure is important. Hackers discover new exploits every day. In fact, more than thirty thousand websites get hacked on a daily basis. Don’t be a part of that statistic. Increase the security of your WooCommerce store before it’s too late.

At Wooassist, we’ve had our fair share of clients that have had their websites hacked. Cleaning up after a hack is a lot of trouble. You have to get rid of the exploit and weed out any remaining backdoors that would allow the hacker to regain access to the hacked site. Worse, a hacking incident can lead to a website being penalized by search engines for containing malware. In this post, we’ll share some tips that you can do right now to increase the security of your WooCommerce store. Following these tips will reduce the odds of your site getting hacked.

1. Check Your Login Information.

Often, hacks happen because of the user’s fault. Almost 90% of cyber-attacks are caused by human error or behavior.

The first step to increase your website’s security is to make sure that your login information is secure. First, don’t use “admin” as your username. Why? Because brute force attacks usually target this username. And if you use admin as your username and have a weak password, it is almost guaranteed that your site will fall victim to a brute force attack. But what if you are already using admin as your username? You’ll just need to create a new administrator account using a unique username and a strong password. WordPress will already recommend a strong password that you can use. After creating a new account, log in to the new account and you can then proceed to delete the “admin” account.

2. Keep your WordPress/WooCommerce Site Updated

Keep your WordPress/WooCommerce Site UpdatedKeeping your WooCommerce store updated will protect your site from the latest known vulnerabilities. Developers regularly patch exploits that are found in their systems so it is imperative that you update on a regular basis.

Before updating however, it is important to test your updates first on a development site or at least create a backup. Often, updates can break your site and this can harm your conversion rates if you don’t have a backup that you can revert to. Websites breaking due to site updates are common. Some hosting providers such as WPEngine provide their customers an easy-to-set-up staging environment. Here you can test your updates before applying them to your live site.

3. Use Two-Factor Authentication.

Using 2-factor authentication greatly increases the security of your website. Even when a brute force attack manages to get into your site, you can block the hack with two-factor authentication. Unless the hackers get a hold of your phone, you’re safe.

4. Install a Security Plugin

A WordPress/WooCommerce site without a security plugin is like a computer without anti-virus software. Wordfence and Sucuri Security are some good options. Just install the plugins and then activate. After activating, just go to the plugin’s settings and configure depending on your needs.

Prevent Brute Force Attacks

5. Limit Login Attempts.

Limiting login attempts will deter brute force attacks. A brute force attack will attempt to guess your username and password sending hundreds if not thousands of requests every minute. Limiting login attempts pretty much renders brute force attacks powerless unless you have a weak password. There are a couple plugins that can help you limit login attempts such as Login Lockdown.

6. Protect your wp-config File

The wp-config file is a crucial part of the WordPress ecosystem. It contains important configuration information of your WordPress site which is why many hackers try to target this file. There is however a workaround to block intruders from getting access to this file. Simply place this code in your .htaccess file.

7. Hide Login Error Messages

Whenever you enter the wrong login credentials on WordPress, it returns an error message saying your username is wrong, your password is wrong, or your password does not match the username. You may think little of this, but for hackers, this bit of information is priceless. You can prevent hackers from getting clues on your WordPress logins. You can hide these error messages by adding the script below to your functions.php file. Do note however that making a mistake when tinkering with your functions.php file can cause your entire site to go down. Unless, you’re a web developer or know your way around the file, it is recommended to have a developer do this for you.

function wrong_login(){

Return ‘Wrong username or password.’;

}

Add_filter(‘login_errors’, ‘wrong_login’);

Hide WordPress Version

8. Hide WordPress Version

For hackers, discovering that your WordPress version is outdated is like finding a gold mine. So it is imperative that you always update to the latest version of WordPress. Many hosting providers will automatically update your WordPress version. However, this is not always ideal since automatic updates can mess up your site. If you’d like to do your WordPress updates at your own pace, then you should hide your WordPress version. To hide your WordPress version, paste the following code on your functions.php file.

function remove_version(){

Return”;

}

Add_filter(‘the_generator’, ‘remove_version’);

9. Do a Plugin Audit

A plugin audit is a process of reviewing the plugins installed on your site. You’ll want to look out for plugins that are no longer being updated by the developer. Outdated plugins usually become backdoors for hackers. When analyzing your plugins, you can categorize them in a number of ways.

  • Plugins that you want to keep.
  • Plugins that you don’t use or your customer’s don’t use. If you have a plugin that adds a certain functionality to your site but your customers are not using it, you might as well get rid of it. This just adds extra bloat to your site.
  • Plugins that are no longer being updated by the plugin author. This is a major security threat and you should get rid of these immediately. If you still need the functionality that the plugin provides, just find an alternative plugin. Just make sure that the new plugin is being constantly updated.

You can do a plugin audit every few months to keep your site spiffy clean.

10. Install Only Reliable Plugins

You’ve done your plugin audit. Great! Now, don’t go down the same road. Don’t just install any plugin that you find. Look at the plugin rating. Check reviews. Check when the plugin was last updated. If the plugin fails any of those three elements, consider finding something else.

11. Prevent Directory Access

If you do not block directory access on your WordPress site, users may be able to freely view the files on your site. These files may contain sensitive information that hackers can use to exploit vulnerabilities on your site. Disabling directory access can be done with a minor tweak. Just place the following code in your .htaccess file:

# Prevent folder browsing

Options All –Indexes

If you’ve done all these things, your WooCommerce store will be protected from most known threats. Should you need help getting any of these done, you can contact the Wooassist team and we’ll be able to help you out.

Do you know of any other things that you can do to help keep your WooCommerce store more secure? Let us know in the comments.
Filed Under: Code Snippets, How-To Articles Tagged With: admin, brute force, hacker, optimizations, plugin audit, plugins, security, WooCommerce, WordPress, WordPress updates

  • « Previous Page
  • 1
  • 2
  • 3
  • 4
  • Next Page »
Let us support your online store so you can manage your business

Get started today

Get 2 Hours of FREE SUPPORT

We are so confident that you will love our services that we will give you your first 4 hours at a 50% discount

That’s 4 hours for only $75

BUY NOW

Free eBook

5 Things Every Online Store Can Fix On Their Website In The Next Week To Increase Sales

Quick Links

  • How it Works
  • Pricing
  • Blog
  • Contact
  • About Wooassist
  • My Account
  • Checkout
  • Privacy Policy
  • Cookie Policy
  • Terms and Conditions

Wooassist

Australia:
59 Luke St.
Hemmant QLD 4174

Philippines:
San Miguel St.
Poblacion, Iligan City 9200

Connect


Copyright © 2026 · Wooassist

Yours FREE!

5 Things Every Online Store Can Fix On Their Website In The Next Week To Increase Sales